Data Storage Guide
Preface
This document describes how data storage for User Profiles and Shared Folders is managed natively by the OVD File Server and how to incorporate external storage devices connected using NFS, CIFS, WebDAV or iSCSI into an OVD system.
Introduction
In larger, existing infrastructures, the File Server is often already present and data is stored on this server. This document will also guide you on how to integrate your existing FS server with the OFS server.
Overview
In an OVD server farm, the OVD File Server (OFS) is responsible for storing User Profile data and providing access to this data to the Linux and Windows Application Servers involved in an OVD user session.
OVD also provides functionality to create and store data in Shared Folders on the OFS and to make those folders available to the Linux and Windows Application Servers involved in an OVD user session. The access permissions (read write or read-only) are managed by functionality on the OSM/OAC.
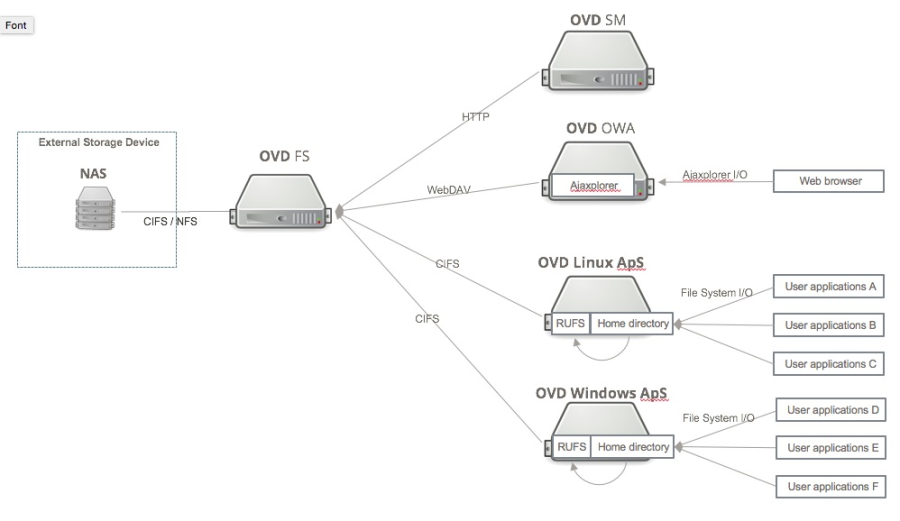
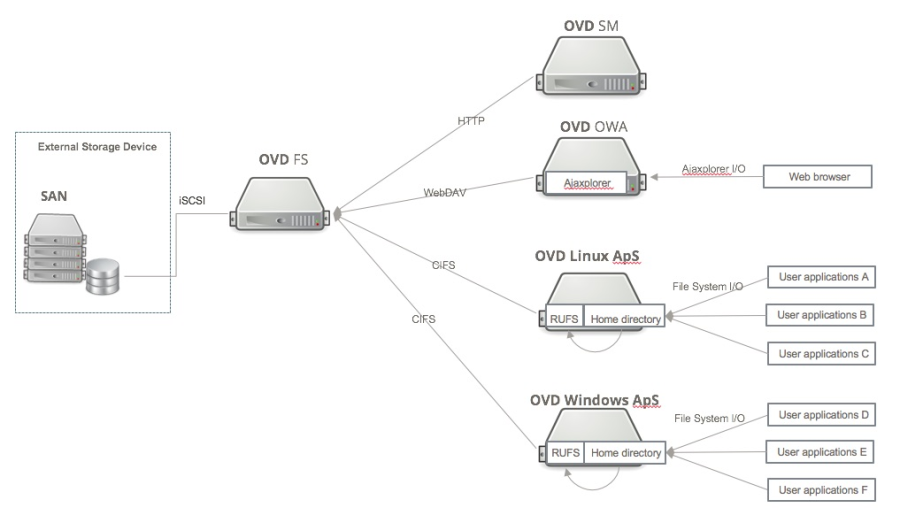
The OFS may be integrated with an external storage device that provides either an NFS drive, a CIFS file share or an iSCSI drive. Access to the data via OVD is still managed by the OFS but the actual data resides on the external storage device. See OVD File Server and External Storage for further details. The two next figures present a high level view of the OFS and the integration between OFS and an external storage system.
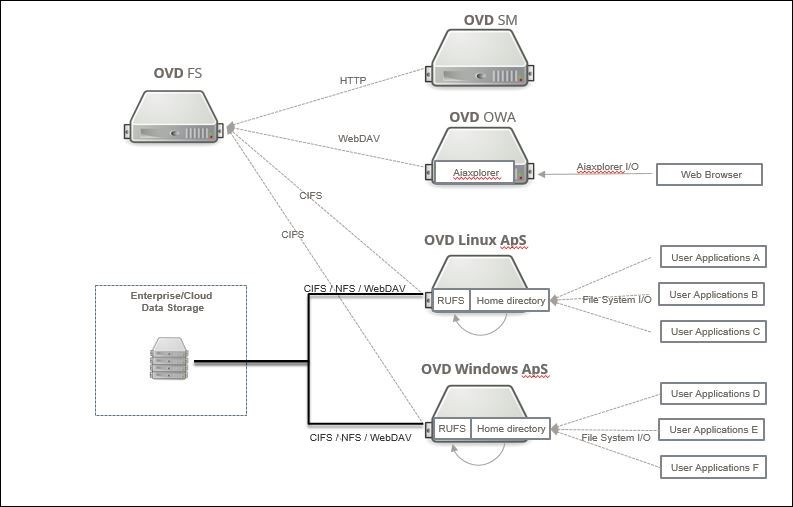
Alternatively, existing folders on an external storage system may be mapped directly to the Linux and Windows Application Servers involved in an OVD user session. In this case OVD provides support for NFS drives, CIFS file shares and WebDAV folders on external storage systems. The external storage system is responsible for access permissions to the data. See Accessing Shared Folders on External Storage for further details. The next figure presents a high level view of the external data storage integration.
Session Administration
Note
The Sessions tab is not available when the administrator has both enabled Multi Tenancy and is in the global view. To regain access to this tab, the administrator must select a tenant.
OVD provides configuration settings that allow the system administrator to manage the availability of User Profiles and Shared Folders in a user session. These settings are accessed in the OVD Administration Console by selecting "Sessions / Session Settings". To enable the use of User Profiles and Shared Folders in a user session, make sure both the following options are set to yes.
- Persistent user profiles
- Enable shared folders
To enable the use of Shared Folders in a user session that are defined as External Data Storage folders, make sure the following option is set to yes.
- Enable shared folders
Further information on configuring the settings for User Profiles and Shared Folders can be found in the Administration Guide.
Problem Determination
OVD logs information about the folders that are mapped into a user session in the session log. The log files for the application servers also display the folders that are mounted and any error information associated with the mount.
In addition, the folders that are available in a user session are added to the archived session reports available at "Status & Reports / Session History" together with the server logs. The "Sessions / User Summary" data also displays the folders that will be mapped into a user session. This information can be checked by the system administrator prior to starting user sessions.
OVD File Server and External Storage
User Profiles and Shared Folders are stored by default on the OFS but it
is possible to configure the OFS to use external data storage. In this
case, the data folder on the external storage system must be mounted at
/var/lib/ovd/slaverserver/fileserver-data on the OFS.
- Data associated with User Profiles and Shared Folders is stored by
the OFS in the directory
/var/lib/ovd/slaveserver/fileserver-data. - The directory
/var/lib/ovd/slaveserver/fsis the mount-bind point for the each running OVD sessions and is used by the OFS.
The external data storage system can be connected to the OFS as an NFS drive, a CIFS shared folder or an iSCSI drive. The steps required to configure OVD for types of external storage are explained in the following sections.
Important
If the directory /var/lib/ovd/slaveserver/fileserver-data already contains
data from previous running OVD sessions you will have to make a backup
of this directory and resynchronize this data into the new mount point.
NFS
The Network File System (NFS) allows a server to share directories and files with other systems over a network. By using NFS, users and programs can access files on remote systems as if they were local files. The steps to prepare an NFS server and to export a folder to be used by OVD are not covered by this document. Contact your system administrator for this information.
Configuration Example
The example below describes the steps to configure the OFS on an Ubuntu system to use an NFS drive for storing User Profiles and Shared Folders.
-
Install the
nfs-commonpackage on the OFS to add support for NFS to the system. -
Ensure no-one is using the system and stop the OVD service.
-
Mount the NFS drive on the OFS by editing the file systems table and defining the mount point and parameters as follows:
-
For NFS version 3:
Where
IP_OR_FQDN_NFSis the IP address or fully qualified domain name of the NFS server./opt/sharesis the directory on the NFS server that is going to be used to store the OVD data. This directory should be empty when defining a new mapping and must have been exported by the NFS server. Enter the appropriate directory name that reflects the environment for your NFS server./var/lib/ovd/slaveserver/fileserver-datais the mount point for the NFS share. This path should be entered verbatim.
For further details on the file systems table, refer to the reference documentation for the corresponding Linux distribution.
-
For NFS version 4, the nfs4 parameter can be used to ensure NFS version 4 will be used as the protocol between client and server.
-
-
Save the changes in the fstab file. The mount command will be executed upon the next reboot. To mount the NFS volume immediately, use the mount command below:
-
Restart the OVD service to activate the new settings.
Verification Steps
- Mount the system by hand or reboot the system as described above.
- Check the directory contents for
/var/lib/ovd/slaveserver/fileserver-data- the folder should reflect the contents of the exported folder on the NFS server. - Create a temporary shared folder via the Administration Console Storage / Shared Folders page.
- Check the directory contents for
/var/lib/ovd/slaveserver/fileserver-data- a folder with the name beginning withsf_should be present.
If the folder is not present then there is a configuration error. Check the configuration steps again and correct any errors.
If the folder is present then the OVD system is now configured to use the NFS drive as the data store for User Profiles and Shared Folders. The temporary shared folder can be removed again.
iSCSI
The Internet Small Computer System Interface, iSCSI, works on top of the Transport Control Protocol (TCP) and allows SCSI commands to be sent end-to-end over local-area-networks (LANs), wide-area networks (WANs) or the Internet.
The steps to prepare an iSCSI drive are not covered by this document. Contact your system administrator for this information.
Configuration Example
The example below describes the steps to configure an Ubuntu OFS to use an existing iSCSI drive for storing User Profiles and Shared Folders.
-
On the OFS, install the
Open iSCSIpackage to add support for iSCSI to your system. -
Ensure no-one is using the system and stop the OVD service.
-
Edit the
/etc/iscsi/iscsid.confconfiguration file and switch thenode.startupsetting to automatic, comment out the manual setting and save the changes to the file. -
Add a link to the iSCSI drive (replace
10.9.0.21by the IP address of the iSCSI drive in your system) -
Configure the access
- Configure authentication method
- Configure username, replace
ovdwith username of your credentials - Configure password, replace
secretwith password of your credentials
-
Perform the login.
-
The iSCSI drive should appear on your system as a new disk e.g. sdb.
``` major minor #blocks name8 0 5242880 sda 8 1 3998992 sda1 8 2 999424 sda2 8 16 409600 sdb -
Create a partition on this new disk.
When prompted, enter n to create a new partition and then enter p to create a primary partition. In this example, the partition will be the first partition so enter 1 as the partition number. Accept the starting and end sector defaults if prompted.
fdisk should now prompt for a new command, enter w to write the partition table to disk. If successful, the message The partition table has been altered or similar should appear. Since the new partition created was partition one, the name of the partition will be
/dev/sdb1. Enter thecat /proc/partitionscommand to verify. -
Restart the OVD service to activate the new settings.
Verification Steps
- Check the directory contents for
/var/lib/ovd/slaveserver/fileserver-data- the folder should reflect the contents of the iSCSI target drive. - Create a temporary shared folder via the Administration Console Storage / Shared Folders page.
- Check the directory contents for
/var/lib/ovd/slaveserver/fileserver-data- a folder with the name beginning withsf_should be present.
If the folder is not present then there is a configuration error. Check the configuration steps again and correct any errors.
The OVD system is now configured to use the iSCSI drive as the data store for User Profiles and Shared Folders. The temporary shared folder can be removed again.
CIFS
Common Internet File System (CIFS) is a file-sharing protocol that provides an open and cross-platform mechanism for requesting network server files and services.
The steps to prepare a CIFS share are not covered by this document. Contact your system administrator for this information.
Configuration Example
The example below describes the steps to configure the OFS to use a CIFS share for storing User Profiles and Shared Folders on an Ubuntu system.
-
Ensure no-one is using the system and stop the OVD service
-
Mount the CIFS shared folder on the OFS by editing the file systems table and defining the mount point and parameters as follows:
//IP_OR_FQDN_CIFS/share /var/lib/ovd/slaveserver/fileserver-data cifs _netdev,users,auto,uid=ovd-fs,gid=ovd-fs,credentials=/root/.smbcredentials,dir_mode=0770,file_mode=0660 0 0Where
IP_OR_FQDN_CIFSis the IP address or fully qualified domain name of the CIFS file server.shareis the directory on the CIFS file server that is going to be used to store the OVD data. This directory should be empty when defining a new mapping. Enter the appropriate directory name that reflects your environment./var/lib/ovd/slaveserver/fileserver-datais the mount point for the NFS share. This path should be entered verbatim.- Enter the remaining parameters verbatim.
For further details on the file systems table, refer to the reference documentation for the corresponding Linux distribution.
-
Create the
.smbcredentialsfile to store the username and password that have been configured for the CIFS share and add the following content:Enter the username and password required for the CIFS share.
-
Save the changes which will be executed upon the next reboot. To mount the CIFS volume immediately, use the mount command as follows:
-
Restart the OVD service to activate the changes.
Verification Steps
- Check the directory contents for
/var/lib/ovd/slaveserver/fileserver-data- the folder should reflect the contents of the CIFS share. - Create a temporary shared folder via the Administration Console Storage / Shared Folders page.
- Check the directory contents for
/var/lib/ovd/slaveserver/fileserver-data- a folder with the name beginning withsf_should be present.
If the folder is not present then there is a configuration error. Check the configuration steps again and correct any errors.
The OVD system is now configured to use the CIFS share as the data store for User Profiles and Shared Folders. The temporary shared folder can be removed again.
Accessing Shared Folders on External Storage
Shared Folders can be created within the data storage system provided by the OFS via the OVD Administration Console and are mounted automatically by OVD into the user session when a session starts. Additionally, OVD may be configured to mount Shared Folders that already exist on an external storage system via the OVD Administration Console. This mechanism allows existing data structures to be used within an OVD user session and provides access to NFS, CIFS, WebDAV and Weka file servers.
Restrictions
SMB - CIFS
As of Windows Server 2019/2022, it is no longer possible to use guest access for Windows. This action is deactivated by default for security reasons.
If you want to allow guest access, you can configure the following Group Policy settings:
Computer configuration\
  Administrative Templates\
    Network\
      Lanman Workstation\
        Enable insecure guest logons
Important
By enabling insecure guest logins, the overall security of the Windows APS will be reduced.
WebDAV
OVD provides support for WebDAV on Linux OAS servers.
If using Ubuntu 18.04 LTS (Bionic Beaver) as OAS, you must install the davfs2 package:
Note
A known Ubuntu 18.04 bug prevents the installation of the latest version of the libneon27 package which davfs2 depends. This is why we have this extra option in the command line.
NFS
The Windows "NFS Client" must be installed on Windows application servers if access to NFS data storage is required. See the relevant Microsoft installation details for the version of Windows in use.
WekaFS
WekaFS is a remote filesystem deliverd by Weka.io.
In order to use Weka with your Linux desktop/applications, the WekaFS driver must be installed. Please refer to [docs.weka.io] for more information and instructions.
Weka.io does not currently provide a driver for Windows. This means Weka volumes will not be available for Windows desktops/applications in OVD (check the NFS fallback).
Note
WekaFS support is not activated by default in OVD. It can be activated using the Administration Console: "System" -> "System Settings" -> "Weka Support".
NFS fallback
The Weka.io volumes can be accessed in NFS in addition to WekaFS. Therefore, OVD mounts Weka volumes in NFS on Windows nodes. OVD also does this on Linux when WekaFS is not installed.
This fallback mechanism is activated by default in the Administration Console. It can be disabled in the "Weka Support" section from the Administration Console.
Please refer to the NFS section for Windows node requirements.
Configuring OVD to use External Data Storage
The OVD Administration Console provides functionality in the Enterprise server to define the data folders on an external storage system that should be made available within an OVD user session. To configure the external data storage, follow the below steps:
- Open the "Administration Console"
- On the "Storage" tab, select the "External Data Storage" item
OVD will display the list of currently defined external data storage folders together with a form to add the configuration parameters to map a folder from an external data storage system.
To manage access to a folder hosted by an external data storage system, click the manage button for the folder and select each User Group that should be given access to the folder. The actual permissions on the folder that define whether it is read-write or read only, are controlled by the external data storage system.
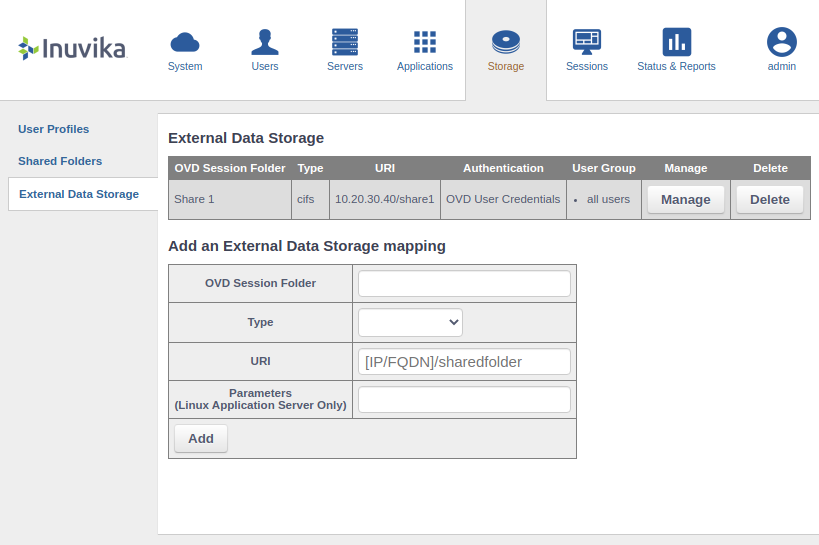
Parameters
The following parameters can be configured for each folder:
- OVD Session Folder: Enter the name of the folder that will be displayed in the OVD User Session.
- Type: Select the type of external data storage that is being mapped from the dropdown list. The options are NFS, CIFS, WebDAV and WebDAVS. Select the type of external data storage that is being mapped from the dropdown list. The options are NFS, CIFS, WebDAV and WebDAVS, and Weka.
- URI: Enter the IP or FQDN of the external data storage server where the data is stored.
- Authentication: Select one of the options for authentication.
- OVD User Credentials: The credentials of the OVD user will be used to mount the folder on the external data storage system.
- Guest User: Sometimes called anonymous user, no credentials will be specified.
- Custom: The system will prompt for the username and password to be used when mounting the external data storage. The password is encrypted and stored in the OVD database. No authentication is required when using NFS and the system will disable the authentication section and set the authentication type to Guest User.
- Parameters: Additional parameters can be specified that will be passed to the Linux application servers being used in the user session and these parameters will be added to the mount command issued by the application server. This setting applies to Linux application servers only.
Note
The OVD user credentials are only available when not using a single sign on such as SAML or Windows Active Directory with Kerberos.
Note
The Parameters can be used to override the protocol version used by OVD to add CIFS resources. You can add vers=1.0 as a parameter to force the use of version 1.0 of SMB (CIFS). This is useful if you would like to add old external data storages.
Using persistent UID/GID with NFS
NFS has been designed for Unix / Posix systems and the NFS permission mechanism is similar to Unix / Linux file permissions: read-write-execute attributes for file owner, group owner and others. It also supports the more recent ACL attributes.
The file owner and group owner are based on user ID and group ID. Every user on the system has a unique user ID so the file attribute is used to assign the user ID to the file. In NFS, the UIDs / GIDs must be the same between the clients and the servers to ensure proper file permissions. In the other hand, in OVD, there is no guarantee that a user will have the same UID in the next session. A temporary user account is created to host the session and destroy at the end of the session. The user account is created by using the first UID available on the system.
Also, this described behavior is only valid for Linux OAS where the Windows system has been designed differently (SID) so there are no native UID / GID attributes for users.
So we can see here a potential incompatibility between OVD and NFS external data storage if the purpose of using NFS is to manage user rights.
The solution to this issue is to configure the "Persistent UID/GID" feature. This requires you to integrate with an LDAP pre-configured with user UID / GIDs.
Please refer to the LDAP integration Guide.
Mapping User Dependent Storage
Sometimes, it may be desirable to map a folder on an external storage system into the OVD user session where the folder URI contains specific information about a user. This is typically the case when mapping a user's home drive into the OVD user session. In this case, it is possible to add a pre-defined variable representing the userid to the URI that will be evaluated by the application server when setting up the shared folder.
In the following example, the external data mapping with the name
Home Folder has been created in the OVD Administration Console
to map the user's home drive. The URI value is set to include the userid
by specifying the ${user} variable as part of that URI:
10.20.30.40/shares/${user}.
When an OVD user now connects to OVD, the ${user} variable will be
evaluated as the userid that was entered when the user authenticated
himself and inserted dynamically into the URI. So when the user with the
userid bendavies starts an OVD session, the folder with the URI
http://10.20.30.40/shares/bendavies
will be mapped into the user session with the name Home Folder.
It is also possible to modify the evaluated value since it is treated as a variable by the underlying code. For example:
${user}: returns the userid{user}[0]: returns the first character of the userid{user}[1:3]: returns the second and third characters of the userid
Additional advanced operations and replacements are also available:
- Operations:
{user}[1:]: returns the userid without the first letter{user}[2:]: returns the fist two characters of the userid${user}[-1]: returns the last character of the userid{user}[-2:]: returns the two last characters of the userid
- Variables:
{user.domain}: return the netbios domain of an Active Directory user eg.TEST{user.upn}: return the user principal name of an Active Directory user ex:user@test.demo
The same templating format can be used for the login field when selecting OVD User Credentials in order to use a variation of the user login for storage authentication.
For instance, when using an SMB storage with Active Directory users, the
user login must contain a form of domain so templating can be used to add
that. Ex: {user.upn} or {user.domain}\{user}.
Verification Steps
The "Sessions / User Summary" page in the administration console displays the folders that will be mapped into a user session by the application servers.
To test that the folders can be mapped, a user session must be started and the availability of the folder checked using a file management application or by saving a test file with an application.
If the folder does not appear, check the application server logs. The log displays information on each folder that is mapped into the user session and also any errors that occur mounting the folder.
Once the changes have been made and verified, the external data storage will be available in future OVD user sessions using the folder names defined.