File Server High Availability Guide
Preface
This document describes the architecture that can be employed to implement a High Availability solution for the OVD File Server together with an example implementation.
Introduction
High Availability solution for the OVD File Server (OFS) allows continued access to OVD user profiles and shared folders should one of the OVD File Servers fail.
A sample implementation using CTDB and NFS technologies is detailed in this document. Instructions are available for Ubuntu 18.04 LTS / 16.04 LTS and RHEL / CentOS 7.
Note
For a reminder of the role of the OFS in the OVD farm, please refer to the Data Storage Guide.
Terminology
In the context of this document, a "cluster" will refer to a collection of hardware or virtual components that work together to provide High Availability. A "node" will refer to each individual host in the cluster.
For OVD File Server High Availability (OVD FS HA), each OFS is considered to be a "node" and the collection of them is a file server "cluster."
What is High Availability
High Availability refers to a system's ability to continue normal operation in the event of a system or component failure. A highly available system is one that uses groups, or "clusters", of computers/components monitored by High Availability software so if a critical component fails, normal operations are restarted on the backup components in a process known as failover. When the primary system is restored, normal operation can be shifted back in a process known as failback.
The main purpose of a High Availability system is to minimize system downtime and data loss.
Single Points of Failure
In order to be considered highly available, a system should minimize the number of single points of failure (SPOFs). A SPOF is a critical system component that will cause system failure or data loss if it goes down. In order to eliminate SPOFs, you must add redundancy and replication. Redundancy involves providing backup components that the system can switch over to if a critical component fails and replication involves ensuring the backup system has access to the same data as the primary system.
Resiliency
Highly available systems strive for resiliency. This means that system failures should be handled quickly and effectively and failover events (switching to backup/primary systems or components) should be as seamless and as quick as possible so as to minimize the impact on users. Resiliency will allow you to guarantee a minimum "uptime" for your system.
Active/Passive HA Configuration
In an active/passive High Availability configuration, redundancy is used to ensure High Availability. A redundant instance of a resource is maintained which remains idle, listening to the primary system. If a failure occurs in the primary node, the idle node activates. The process of failover occurs, relocating resources and connections from the failed primary node to the backup node.
For this configuration, backup instances have identical state through a data replication and synchronization process (see section Data Replication) so a request to one instance is the same as to another, meaning a switch to a backup system will still give end users access to the same data.
This configuration can also be setup to failback, either automatically or manually. For automatic failback, once the failed node is back online, resources and connections are moved back to it, reinstating it as the primary node, and the secondary node returns to idle, listening mode. For manual, the administrator can switch service back to the primary node or let the secondary node function as the new primary node and use the old primary node as the new backup.
Active/Active HA Configuration
In an active/active High Availability configuration, redundancy is still used to ensure High Availability, as in each service has a backup that the system can revert to in case of failure, but in this setup all systems are online and working concurrently. In the case of a failure, when failover occurs it is relocating resources and connections to a system that is already working. So instead of activating and taking this load on, the backup system already has its own load and simply takes on more. In this case it is not true failover but rather resource reallocation/load balancing.
For this configuration, all instances have identical state through a data replication and synchronization process (see section Data Replication) so a request to one instance is the same as to another, meaning each running instance can take on another's load with no difference in service to the end user.
This configuration can also be setup to failback automatically. Since an active/active configuration has all instances operating at once, a Load Balancer is typically used to allocate resources across all instances. Once the failed node is back online, the Load Balancer will redistribute resources and connections between all instances, included the newly repaired one.
The Need for High Availability with OVD File Server
The OVD File Server (OFS) component provides centralized access to user data for both Linux and Windows Application Servers. For instance, a user that is running a session with both Linux and Windows can first create a file with a Linux application, and can then open the same file with a Windows application without requiring any additional permissions or dealing with any cache issues.
Inuvika OVD provides two types of storage:
- User Profiles (including session-based data)
- Shared Folders
The goal of having a High Availability configuration for your OVD Farm is to allow for servers of the same role to carry out the tasks when another server of the same role goes down, with minimal service disruption resulting from it being down.
A highly available OFS setup ensures:
- Availability of your data
- Availability of data access (CIFS & WebDAV)
In other words, if one of your File Servers crashes:
- No data will be lost
- Running sessions will remain alive after failover (potentially up to a one (1) minute I/O freeze)
- New sessions can still be started after the failover has completed (delay of less than 1 minute)

Configuring High Availability for OVD File Server
OVD File Server High Availability is not a standalone OVD feature. The following external components are required in order to setup a highly available OFS cluster.
Prerequisites
General
This feature is not a standalone OVD capability and requires:
- Investigation of the existing IT setup in order to determine which existing components can be used and which components will need to be installed
- Implementation of a Data replication / Data cluster mechanism (follow the guidelines in section Data Replication)
- Implementation of a Load Balancer mechanism (follow the guidelines in section Load Balancer)
Minimum Requirements
- Two dedicated OVD File Servers (OFS). For High Availability the file server must not act as an OVD Application Server, Session Manager, or any other such service. It must be dedicated to only the File Server role.
- An understanding of network and system administration
- In general, all the servers involved in an OVD farm should be time synchronized. As an absolute minimum for High Availability, the file servers must be time synchronized using NTP.
Recommended Requirements
- An external Load Balancer
- An external NAS to store the data
- All OVD FS servers should run the same Linux distribution and have the same version and system architecture
- Two NICs / VLAN
- One dedicated VLAN (and NIC if possible / recommended) for cluster (data replication and synchronization) management
- Redundant power supplies which power your external storage device(s) and the servers.
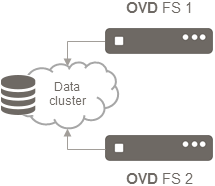
Data Replication
In order to ensure users still have access to their OVD data (Shared Folders and User Profiles) when failover occurs, the secondary system must have the same available data as the primary system. This can be achieved through replication, a process by which data is synchronized between the primary and secondary systems.
Additional benefits of this synchronization are:
- No data is lost if a crash occurs
- The Samba configuration will be replicated between the OFS servers
All the OVD File Servers in your highly available cluster must have
synchronized data in the /var/lib/ovd/slaveserver/fs.real folder or,
if no default location is specified, the data_dir path defined in
the /etc/ovd/slaveserver/slaveserver.conf file.
The data replication / synchronization mechanism can be one of the following:
- An external NAS (CIFS, NFS)
- An external data cluster volume (GlusterFS/CEPH/GFS2)
The Administrator must choose an option to implement from this list. If your system already has a suitable NAS, we strongly recommend you use it.
For further details see the Data Storage Guide.
Load Balancer
The Load Balancer has two roles: First balance the charge between two or more nodes that can give the same answer, this allows to scale horizontally to handle more users. Secondly it detects down nodes and redirects the traffic to other available nodes, it prevent any lost of service if one or more component crashes.
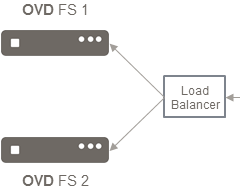
There are different technologies available for balancing the traffic. Some require a network component like a switch as an hardware solution. On the other hand, software solutions usually rely on Virtual IPs also known as Shared IP. A Virtual IP (VIP) is an IPv4 IP that is controlled by the Load Balancer to be allocated on or another node. This IP must be reserved on the DHCP to not be allocated as it will be controlled by the Load Balancer.
Virtual IP addresses (VIPs) are a core component of High Availability. A VIP is an IP address mapping. It is used in place of an actual IP address so that the same VIP can be used to point to many different IPs. For a High Availability cluster, VIPs are used to access critical components so that if they fail, the Load Balancer can change the mapping to have the VIP point to a secondary component.
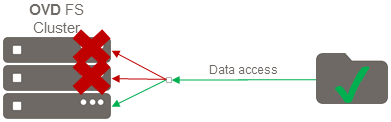
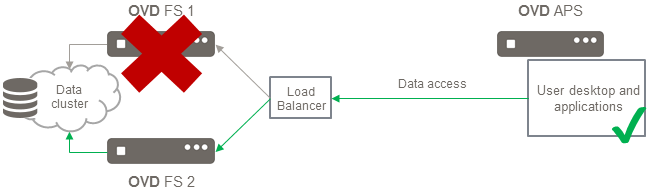
For a highly available OVD Farm, the VIP will be used for all CIFS/WebDAV connections to the OFS. This VIP must always target an online node.
In the diagram below, the VIP directs traffic to OVD FS 1 until failure occurs. When it does, it shifts traffic to OVD FS 2 instead, until OVD FS 1 is restored.
Load balancer / VIP management solution can be one of the following:
- HAProxy, Zevenet or F5 Networks
- Pacemaker + Heartbeat / Corosync
- Samba CTDB
The Administrator must choose an option to implement from this list. If your system already has a suitable Load Balancer, we strongly recommend you use it. Otherwise, section Implementation FS HA with NFS External storage and Samba CTDB will guide you on how to setup Samba CTDB.
Complete Architecture
Given any chosen data replication and load balancing solution, here is what the completed infrastructure should look like:
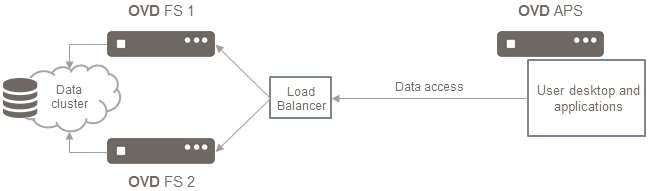
If something goes wrong, the data access would be redirected to the secondary node as shown below:
Session Manager Role
The OVD Session Manager (OSM) currently provides support for one High Availability File Server cluster. The OSM is aware of each File Server in the cluster and acts as the user management component, system management component, and primary configuration for the entire OVD system.
You can configure the OSM through the OVD Administration Console (OAC) to implement High Availability for the file servers (see section Session Manager Configuration).
Implementing File Server High Availability with NFS External Storage and Samba CTDB
This section will walk you through the set-up and configuration of Samba CTDB (Clustered Trivial Data Base) to provide highly available file storage. The implementation requires an external storage so we will use NFS in our examples.
Overview
Samba CTDB is a thin and efficient database that allows for the creation of a clusterized Samba. It makes it possible for Samba to serve data simultaneously from different hosts in a network and provides High Availability features such as node monitoring (for the purposes of failover and failback), node failover, and IP takeover (reassign VIP addresses during failover and failback). Visit the official website at https://ctdb.samba.org/ to learn more.
The advantages of making the file mount point highly available using an NFS server:
- Speed: persisting data on the file server itself may be slower than an NFS server
- Reducing the file server disk space requirements: offloading the profiles and session data to an NFS server which is equipped for bigger files is more efficient. Having them on the file server itself is duplication and may (unnecessarily) dramatically increase the size of the partitions
- Convention: it is a normal convention to have one centralized external mount point for a file share instead of duplicating the synchronization.
Here is the proposed design:
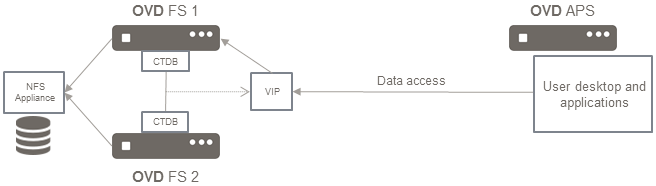
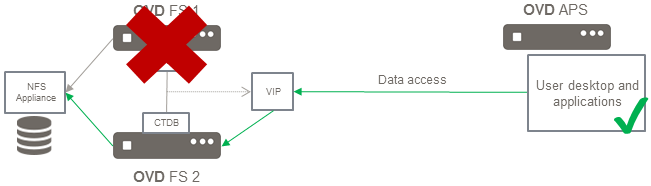
The above diagram is an implementation of the Complete Architecture. For this solution, an NFS appliance is being used as the Data Cluster and CTDB is used as the Load Balancer.
Basic Requirements
Two OVD File Servers that run the same Linux distribution, version, and have the same system architecture.
The OVD File Server (OFS) role should be running on each server and no other roles should be active on that server (it is not possible to mix several roles in this configuration).
NFS Server Requirement
As discussed in the Introduction, High Availability involves handling all Single Points of Failure. This sample implementation involves using an NFS server for storing data, which is a SPOF. Therefore, in order to ensure this solution achieves High Availability, the NFS server must be made highly available in addition to the OVD File Servers.
Each OFS node must be configured to host the data on the same NFS volume. Instructions to set this up are provided in the Data Storage Guide.
In addition to the OVD storage volume, this configuration also needs
a dedicated NFS volume for Samba/CTDB data. This volume will require the
no_root_squash option, so make sure to select it when setting up the
NFS server.
Optional Configuration
Two NICs/VLAN: one dedicated VLAN (and NIC if possible) for CTDB management.
Create 2 different NFS volumes: one for OVD storage and one for CTDB. This is because the OVD volumes have specific requirements that CTDB does not.
Network Configuration
For the sake of providing a concrete example, the following IPs are examples and assume a class C network of /24 with the 192.168.33.0/24 subnet of 255.255.255.0.
- Dedicated VLAN: 192.168.33.0/24
- node1: 192.168.33.11
- node2: 192.168.33.12
- LAN: 172.16.4.0/24
- node1: 172.16.4.22
- node2: 172.16.4.24
- VIP: 172.16.4.26
Important
Make sure that the virtual IP has been reserved in your DHCP configuration if a DHCP server is running on the LAN
Command Line Context
The command lines displayed with a # must be executed as root. To run a
command line as root, the most popular method is to prefix it with
sudo (ex: sudo apt update). So, every time you see a command line
in this documentation starting with # , you must prefix it with sudo.
As an alternative, you can choose to run a root session by using sudo -s.
Once this is done all the command lines you run will be run as root.
This method is generally not recommended unless you are sure of what you
are doing.
For systems not using sudo, you must run a root session by using the
su prefix instead.
Implementation
The OFS role must be installed following the Installation and Configuration Guide.
Prepare the OFS to store data on the NFS
We will use an NFS server (one that exists and authorizes the OFS servers) to write to a specific shared directory.
- Mount the two NFS share directories (that were created before) on
each OFS server (mount command or in the
/etc/fstab)- mount the
ofsstorage on/mnt/nfs/ovd - mount the
ctdbon/mnt/nfs/ctdb
- mount the
- Edit the
/etc/ovd/slaveserver/slaveserver.conffile and configure thedata_dirpath according to the mount point (../mnt/nfs/ovd)
Prepare configuration files for CTDB
The following steps must be carried out on one OFS server and the configuration will be pushed to the shared directory on the NFS server. It will contain the configuration files.
- Mount the NFS mount point that will store the CTDB configuration and
the OVD users profiles in
/mnt/nfsThe path for the directory on the NFS server that is going to be used to store the OVD data depends on the NFS server configuration. -
Create the folder which will contain the user profiles
# mkdir -p /mnt/nfs/ovd -
Create a shared folder for the CTDB configuration
# mkdir -p /mnt/nfs/ctdb -
Create a private directory for the Samba configuration
# mkdir -p /mnt/nfs/ctdb/private -
Create the
/mnt/nfs/ctdb/ctdb.conffile with the following content# vi /mnt/nfs/ctdb/ctdb.conf CTDB_RECOVERY_LOCK=/mnt/nfs/ctdb/lockfile CTDB_MANAGES_SAMBA=yes CTDB_NODES=/mnt/nfs/ctdb/nodes CTDB_PUBLIC_ADDRESSES=/mnt/nfs/ctdb/public_addressesWarning
For Ubuntu 18.04 LTS (Bionic Beaver) and Ubuntu 16.04 LTS (Xenial Xerus), you must also add the following lines to this file:
CTDB_SERVICE_SMB=smbd CTDB_SERVICE_NMB=nmbd -
Copy the Samba configuration file
# cp /etc/samba/smb.conf /mnt/nfs/ctdb/smb.conf -
Add the following line to the end of the smb.conf file.
clustering = yes
idmap backend = tdb2
private dir = /mnt/nfs/ctdb/private
Note
On Ubuntu 18.04 / 16.04 you can replace the line
imap backend = tdb2withidmap config * : backend = tdb2to avoid the deprecated option warning printed bytestparm /etc/samba/smb.conf -
Create the nodes file and add the IPs for the OFS servers involved in the cluster
# vi /mnt/nfs/ctdb/nodes 192.168.33.11 192.168.33.12 -
Create
/mnt/nfs/ctdb/public_addresses(contains all the VIP addresses used for the cluster) and add:# vi /mnt/nfs/ctdb/public_addresses 172.16.4.26/24 ens32Change ens32 by the name of your NIC if it's different.
Install and configure CTDB on Ubuntu LTS
On each OFS servers
-
Stop the OVD service
# systemctl stop ovd-slaveserver -
Stop and disable Samba (CTDB will manage the samba service
# systemctl stop smb # systemctl stop nmb # systemctl disable smbd # systemctl disable nmbd # systemctl disable samba-ad-dc -
Install the CTDB package
# apt install -y ctdb -
Stop the OVD service
# systemctl stop ovd-slaveserver -
Mount the NFS share on each OFS server (mount command or in the
/etc/fstab) in/mnt/nfs/The mount point contains theovdandctdbdirectories. - Edit the
/etc/ovd/slaveserver/slaveserver.conffile and configure thedata_dirpath according to the mount point (../mnt/nfs/ovd) -
Unlink those files
# unlink /etc/samba/smb.conf # unlink /etc/default/ctdb -
Create the symlinks for
# ln -sf /mnt/nfs/ctdb/smb.conf /etc/samba/smb.conf # ln -sf /mnt/nfs/ctdb/ctdb.conf /etc/default/ctdb -
Start the OVD service
# systemctl start ovd-slaveserver -
Start the Samba CTDB service
# systemctl start ctdb
Install and configure CTDB on RHEL / CentOS 7
On each OFS servers
-
Install the Samba CTDB package
# yum install ctdb -
The OVD service must be stopped during the configuration
# systemctl stop ovd-slaveserver -
Mount the NFS share on each OFS server (mount command or in the
/etc/fstab) in/mnt/nfs/The mount point contains theovdandctdbdirectories. - Edit the
/etc/ovd/slaveserver/slaveserver.conffile and configure thedata_dirpath according to the mount point (../mnt/ovd/nfs) -
Unlink those files
# unlink /etc/samba/smb.conf # unlink /etc/ctdb/ctdbd.conf -
Create the symlinks for
# ln -sf /mnt/nfs/ctdb/smb.conf /etc/samba/smb.conf # ln -sf /mnt/nfs/ctdb/ctdb.conf /etc/ctdb/ctdbd.conf -
Configure the services as below
# systemctl stop smb # systemctl stop nmb # systemctl disable smb # systemctl disable nmb # systemctl enable ctdb -
Start the OVD service
# systemctl start ovd-slaveserver -
Start the CTDB service
# systemctl start ctdb
Validation
Check the status of Samba CTDB to see if there is any anomalous behavior. Check basic information and the status of your cluster nodes using the command:
# ctdb statusThe output will inform you of the status of each node (i.e. whether they are okay or not) and the status of your system (Recovery mode should be NORMAL if the system is okay).
Number of nodes:2
pnn:0 192.168.33.11       OK (THIS NODE)
pnn:1 192.168.33.12       OK
Generation:974418464
Size:2
Recovery mode:NORMAL (1)
Recovery master:0
Check the status of the IP addresses using the command:
# ctdb ip
Public IPs on node 0
172.16.4.26 0
Each IP that is being served will be listed, along with the cluster node serving it.
Session Manager Configuration
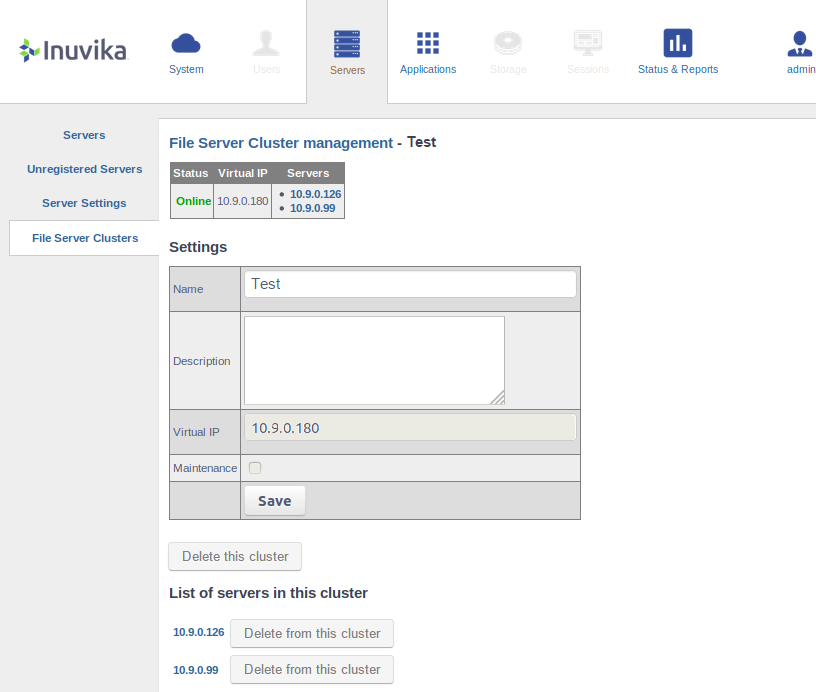
Once the installation has been completed for each node, the High Availability system is ready to be configured for use in OVD. Login to the OVD Administration Console (OAC), go to the "Servers" tab and select "File Server Clusters".
Note
Fileserver clusters are tenant spacific. A tenant must be selected before a file server cluster can be added.
Here you can create your new cluster. Give the new cluster a name and click Add. You will be redirected to the management page for your new cluster, where you can define the different components. On this page add the OVD File Servers that are part of your cluster and enter the IP of your VIP.
In order to have File Server High Availability operational, a File Server Cluster requires at least two OVD File Servers and both should be online and in production mode. If either OFS is offline or in maintenance mode, the one that is still available will be used but the system will not have High Availability.
Note
If you set any of your file servers to maintenance mode, the servers will still remain synchronized as the data synchronization is handled by CTDB and the NFS mount point, which will still be functional on the servers in maintenance mode.
When your cluster is fully defined, uncheck the Maintenance option and save the change to switch the cluster into production.
Warning
The OVD FS HA feature does not actively alert the administrator of a failback or a fault in the High Availability. It is up to the administrator to put in hardware or their own detection system to ensure that the services and the hardware are running and working. However, OVD will still log the event of a failback or resiliency FS switchover, so an administrator can regularly monitor logs for these notifications.
Testing File Server High Availability
The reason to create a highly available OFS system is to ensure little to no impact on the environment if one server crashes. So it is important to simulate a server crash to ensure the feature is working as intended. Once your highly available system is setup, you can carry out some of the tests in this section to validate that the system is working correctly.
General
Scenario 1: Network Down You can shut down the network on which your master virtual machine is running and then check the system's behavior. Some suggestions for what to look for are noted below.
Scenario 2: Power Down You can shut down the master virtual machine and then check the system's behavior. Some suggestions for what to look for are noted below.
System Checks: Are running sessions impacted?
- In a highly available setup, there will be up to a one (1) minute I/O freeze for OVD sessions that are active. Any other impact is not expected.
Did the VIPs switch between servers?
- If a server goes down, the VIP should shift to one of the backups.
What happens when the network is enabled again?
-
Does the system automatically failback to the primary nodes if it has been setup to do that? Or should it stay on the current primary node and retain the recovered one as the failback option?
Whatever the chosen configuration, the most important thing to consider is stability. It is important to make sure that recovering the damaged node does not have a negative impact on the service to users.
Test Scenarios
For more thorough testing, you can follow the test matrices described in this section.
Each test details a scenario ("State") and the status of each OFS. Carry out the scenarios with the File Servers in the specified state. If you get the results listed in the test matrix, the test passed and you can proceed. If your results differ from the ones listed, there may be a problem with your system setup.
Test 1
| State #1 | Result | State #2 | Result | |
|---|---|---|---|---|
| Open a session, access/create a file, log out | Open a session, access/create a file, log out | |||
| FS node 1 | Alive | Works | Alive | Works, data still accessible |
| FS node 2 | Alive | Works | Down | Site offline |
Test 2
| State #1 | Result | State #2 | Result | |
|---|---|---|---|---|
| Open a session, access/create a file, log out | Open a session, access/create a file, log out | |||
| FS node 1 | Alive | Works | Down | Site offline |
| FS node 2 | Alive | Works | Alive | Works, data still accessible |
Test 3
| State #1 | Result | State #2 | Result | |
|---|---|---|---|---|
| Open a session, access/create a file, log out | Open a session, access/create a file, log out | |||
| FS node 1 | Alive | Works | Alive | Works |
| FS node 2 | Alive (in maintenance mode) | Still works in maintenance mode. | Alive (online) | Works, data in sync and accessible |
Test 4
| State #1 | Result | State #2 | Result | |
|---|---|---|---|---|
| Open a session, access/create a file, disconnect | Reconnect the session | |||
| FS node 1 | Alive | Works | Alive | Works |
| FS node 2 | Alive | Works, data in sync | Alive | Works, data in sync and accessible |
Test 5
| State #1 | Result | State #2 | Result | State #3 | Result | |
|---|---|---|---|---|---|---|
| Open a session, access/create a file, disconnect | Reconnect the session | Recover FS node 2 | ||||
| FS node 1 | Alive | Works | Alive | Works | Alive | Works |
| FS node 2 | Alive | Works, data in sync | Down | Offline, no data synched | Alive, recovery complete | Works, data in sync |
General Troubleshooting
When encountering problems with your highly available setup, the path for investigation should be Data Replication (ex: NFS) → VIP Management (ex: CTDB) → OFS → OSM/OAC.
If you are using CTDB, see section Samba CTDB troubleshooting for troubleshooting tips. If you are using any other tools for data replication and/or VIP management, please look at the official documentation for the tool.
If there are no issues at the data replication or VIP management levels, read on for troubleshooting tips for the OFS and OSM/OAC.
OVD File Server
General Information
Check which, if any, OFS processes are currently running on your system using the command:
# ps auxf | grep ovd-slaveserverService Logs
Look through the OFS service logs to see if any unexpected behavior has
been logged. The logs will be located at
/var/log/ovd/slaveserver.log and /var/log/ovd/rufs.log. Check
slaveserver.log first as it will contain most pertinent information -
rufs.log can be checked if additional details are required.
Note
This log file contains many debugging messages and may be too difficult to parse enough meaningful information from - use it as a last resort.
Samba CTDB troubleshooting
For general CTDB troubleshooting, please refer to the Samba CTDB documentation at https://ctdb.samba.org/documentation.html. If your issue is not addressed on this page, follow the suggestions below to investigate and identify any issues:
Service Status
Check the statuses of the services used by CTDB and ensure they are all running. All three of these services should be running in order for CTDB to be functioning properly.
Check CTDB using the command:
# systemctl status ctdbCheck Samba using the command:
# systemctl status smbdCheck the NetBIOS name server using the command:
# systemctl status nmbdService Logs
Look through the CTDB service log to see if any unexpected behavior has
been logged. The logs are located at /var/log/log.ctdb
or /var/log/ctdb/log.ctdb.
OSM / OAC
Check the general status of the cluster through the OAC. Login to the OAC, go to the "Servers" tab and select "File Server Clusters".
Check that the cluster is defined. If it is, there should be an entry for it on this page. Click on the cluster to go to its management page. Here you should check if:
- The cluster is in production mode
- The VIP is valid
- All nodes are online and in production mode
If everything is fine, you can check the OSM logs for any anomalous behavior. Go to the "Status & Reports" tab and select "Logs".
Firewall
Check your firewall to make sure it is not interfering with the cluster. Monitor the traffic and ensure CIFS/WebDAV communication is targeting the appropriate VIP and that the OSM is also able to communicate with the VIP.