One Touch Installation
Overview
OVD One Touch is an interactive shell script that provides an easy way to install different OVD roles and utilities needed for deployment of a fully functional OVD farm.
As an alternative to manual installation, OVD One Touch can install not just individual OVD roles, but also a quick "all-in-one" solution (where Session Manager, Web Access, File and Application Servers are installed within the same environment) and additional utilities that simplify additional configuration of the farm.
Requirements
Please make sure that all servers meet minimal system and hardware criteria for their corresponding OVD roles as listed in requirements.
Important notes
-
Internet access is required to install with the OVD One Touch installer, and if you are using URL filtering, please allow access to https://ovd.one and https://archive.inuvika.com alongside the standard operating system repositories required.
-
All commands need to be run with root privileges.
-
Where multiple roles are required on the same server, the installer can be re-run multiple times.
-
If you make a mistake during installation, you can abort the script at any point by pressing CTRL + C.
-
OVD Enterprise Secure Gateway (optional) must be installed on a separate server.
-
For RHEL7 and RHEL8: OVD is compatible with SELinux. If SELinux is enabled, the installation process will configure SELinux rules accordingly. If SELinux is disabled, it will remain so, and no SELinux rules will be applied.
Installation walk-through
-
Connect to the server you want the role/utility to install. For Windows Application Server role installation, use any other role server.
-
Elevate your shell to the superuser if you are not already root:
-
Update your system
-
Ubuntu
-
RHEL
-
-
Download and launch installation script, replacing the
<version>with the specific version code you wish to install:or
Info
You will find the version code on the Inuvika OVD supported versions page. You may also contact Inuvika to request the code.
-
After a short period, you will be presented with the welcome screen. Press ENTER to proceed with a preparation of the installation environment.
Installation options
After the successful preparation of the installation environment, the following options will appear in the menu:
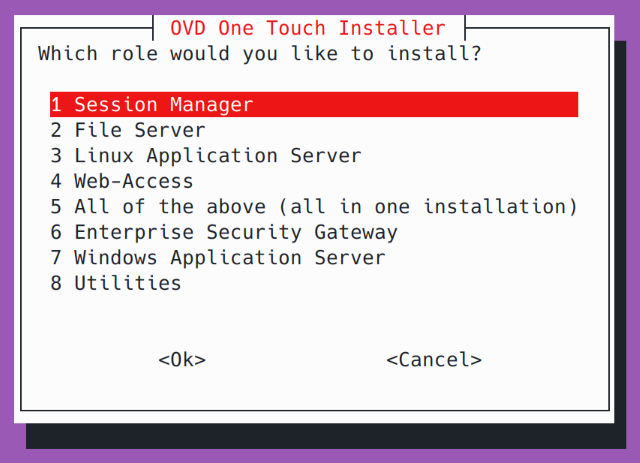
Options 1-4 and 6 install specified roles.
Option 5: All of the above (all in one installation) installs following roles on the same server:
- Session Manager
- File Server
- Linux Application Server
- Web-Access
Option 7: Windows Application Server remotely installs Windows Application Server on any supported Windows server. Please refer to Windows OVD Application Server installation for more information.
Option 8: Utilities displays selection of following options:
- Setup ESG for Let's Encrypt
- Install Grafana Server
- Install Speed Test on the OWA
Please choose the required option and press ENTER. Depending on the role selected, the Installer will then ask you for additional information such as IP address, passwords etc.
The installer will then beging and automatically install the requested roles and/or features you have requested
Windows OVD Application Server installation
The Installer allows you to install OVD Windows Application Server remotely from any supported Linux server.
Important
If you plan to integrate application server with Active Directory domain, do not join the server to the domain before finishing OVD installation.
Before running the Installer, you need to configure Windows server as follows:
Important
You must use the local administrator account.
If you encounter an SSL/TLS error, please run this command first:
[Net.ServicePointManager]::SecurityProtocol = [Net.SecurityProtocolType]::Tls12,[Net.ServicePointManager]::SecurityProtocolEach option will ask a series of questions for information such as IP address, passwords etc. Please answer these in sequence. Remember that all inputs are case-sensitive.
Error Messages
If installation process fails, error is displayed as standard error in the output of the shell. The complete installation standard output is stored at /var/log/ovd-install.log.
These are the most common errors:
- Invalid version number
- Connection issues related to DNS, Proxy servers
- Configuration input mistakes (invalid version number, incorrect IP address, incorrect password...)
After resolving the issues, run the script again and selected.
If you are not able resolve issues yourself, please contact
Inuvika Support and include a copy of the log file from
/var/log/ovd-install.log of the affected server.
Cleanup and Next Steps
Remove the playbooks containing sensitive information:
Remove the folder with installation credentials:
Remove Ansible installation files and directories:
To finalize your installation, please follow Initial Configuration.