Session Manager Failover Guide
Preface
The purpose of this document is to provide a failover configuration for the Inuvika OVD Session Manager (OSM) in order to ensure availability of the OVD farm in the case an OSM node fails.
Introduction
When deploying a service an important consideration administrators should make is about the software’s resilience and availability. In other words, how will the service be impacted in case of disruption. OVD has multiple safeguards providing a fault-tolerant service. This document focuses on a particular service: the Session Manager.
In order to avoid having a single point of failure in your environment, Inuvika recommends the implementation of an active-passive configuration (also called failover) for the Session Manager role.
This guide provides step-by-step setup instructions, along with a deployment plan, in order to simplify the deployment of the configuration in a production environment.
The documented configuration is based on an active/passive architecture, using the high availability resource manager software Pacemaker. For more information about Pacemaker, visit the ClusterLabs website.
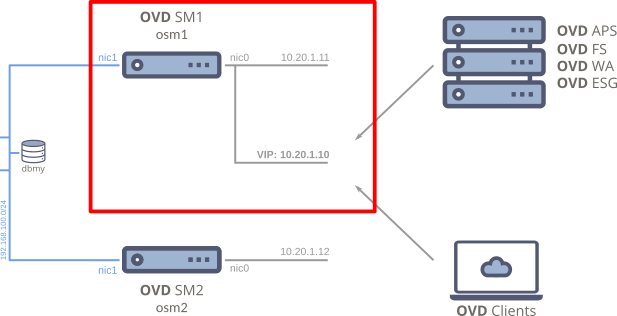
Overview
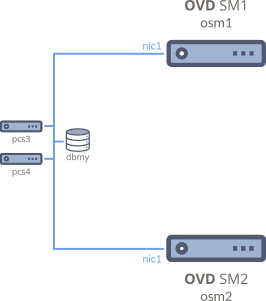
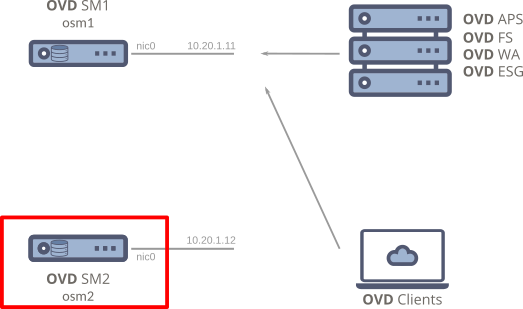
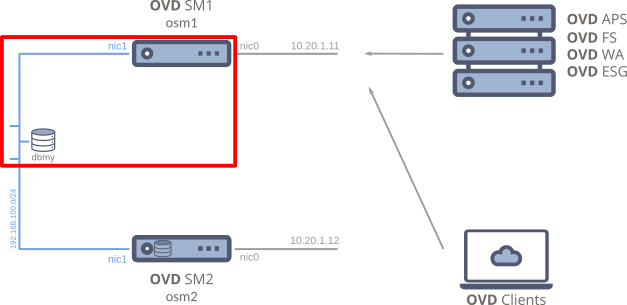
The Session Manager Failover configuration is composed of 5 nodes communicating in a dedicated network.
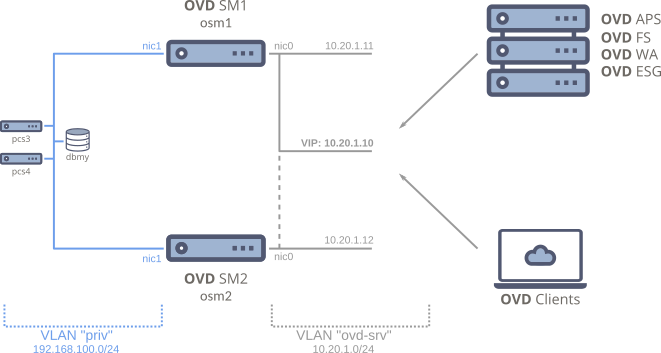
Nodes:
-
osm1andosm2: Two OVD Session Manager (OSM) hosts working in an active-passive configuration. -
dbmy: A dedicated node that hosts the MySQL database for OVD. -
pcs3andpcs4: Two extra pacemaker nodes for a proper quorum and monitoring of the cluster.
Network:
-
VLAN ovd-srv: The VLAN of the OVD infrastructure. -
VIP: 10.20.1.10: A virtual IP address (VIP), in theovd-srvVLAN, that is shared by the OSM nodes. Note that each OSM node also has a regular IP address. The difference is that the VIP is not attached to a specific device (mac-address).In this configuration, all other nodes in the OVD infrastructure are communicating with the Session Manager via this VIP (both incoming and outgoing traffic).
-
VLAN priv: A dedicated VLAN for the communication of the cluster.
Support
The configuration described in this document is supported for the following Linux distributions:
- RHEL 8 64-bit (for OVD version >= 3.3.0)
- RHEL 7 64-bit
- Ubuntu 22.04 LTS server (Jammy Jellyfish) 64-bit (for OVD version >= 3.2.1)
- Ubuntu 18.04 LTS server (Bionic Beaver) 64-bit
- Ubuntu 16.04 LTS server (Xenial Xerus) 64-bit (for OVD version < 3.2)
Prerequisites
The Session Manager Failover setup has a clear list of requirements. Please pay careful attention to this section to ensure a successful deployment.
Existing OVD farm
The starting point for this document is an existing OVD farm.

The farm can be either in a production state or simply in a prototype/PoC state. This document is designed to guide you through transitioning the OSM service to a failover setup.
The current Session Manager node in the existing farm will become osm1 in our
example.
Maintenance periods
Parts of this document will require you to switch your OVD farm to Maintenance Mode. This means users will not be able to use OVD during these periods.
If you do not already have a deployed OVD farm but you know this configuration will be deployed later, please read the rest of the requirements first and install a farm using the Installation and Configuration Guide.
Dedicated OSM
This configuration requires the node hosting the Session Manager to not host any other OVD role but the Administration Console.
If this is not the case in your infrastructure, your first step should be to migrate those services one-by-one to one or more new dedicated virtual machines.
Infrastructure requirements
The Session Manager Failover setup has additional infrastructure requirements in addition to what a simple OVD farm needs.
The configuration will require:
-
4 new virtual machines to create the cluster
-
A dedicated network (
privVLAN) for cluster purposes.Note
Some of the nodes require 2 Network Interface Controllers (NIC); one for each VLAN.
-
1 virtual IP address (VIP) to be used as the Session Manager access point for both incoming and outgoing traffic.
This IP address will not be attached to a specific device but will be shared between the 2 OSM nodes.
-
SSH connectivity to each server node. The configuration contains a few long and/or complex command lines so it will be best to copy & paste them.
Even if these command lines and configuration files often need to be customized for your own naming conventions, it is recommended to copy & paste (using a text editor for customizing them) rather than try to re-type them word by word as this introduces the risk of creating minor changes that may be difficult to find and debug.
-
Internet access for package installation on all nodes.
When adding the SSH connectivity requirement and the 2 different VLANs, you must make sure that routing is in place.
Time & Effort Requirements
-
The solution is not trivial to implement and is best handled by an experienced Linux administrator.
Some knowledge and/or experience on the Pacemaker software is highly recommended.
This guide will provide instructions on how to set up a basic cluster but it will not cover all possible outcomes of what Pacemaker must deal with and the associated manual recovery steps.
-
This document focuses on reducing downtime to a minimum. But due to these downtimes and the time required to execute the configuration, this full operation should be viewed in terms of days/weeks instead of hours.
Draw a plan and prepare your infrastructure
As explained earlier, this configuration is not trivial and will require some effort to complete. In order to make things easier, Inuvika recommends starting by writing a plan with the following information.
-
Choose a name and IP subnet for the dedicated cluster VLAN. In this document:
- VLAN Name:
priv - IP subnet:
192.168.100.0/24
- VLAN Name:
-
Allocate the virtual IP address in the
ovd-srvVLAN. Make sure this IP is reserved in your DHCP so it will not be allocated.In our example, we will be using
10.20.1.10. -
Define a name and IP plan for the nodes in the cluster.
-
hostname: The 2 OSM nodes and the 2 PCS nodes must have a unique hostname.
In this document, we use
osm1as the hostname for the first OSM andosm2for the second one. In addition, we usepcs3andpcs4for the 2 PCS nodes.Warning
In this example, your existing Session Manager server will become
osm1.So we are not creating 2 OSM nodes but only one as we will also be using the existing OSM.
-
network: Describe the dedicated LAN that will be used by the cluster.
In this document, we use
privas the name for our private LAN.This means that on the dedicated LAN these nodes will be known as:
osm1.privosm2.privpcs3.privpcs4.privdbmy.priv
-
IP: Define the static IPv4 addresses to be used in the dedicated LAN.
In this document, we use:
192.168.100.11forosm1.priv192.168.100.12forosm2.priv192.168.100.13forpcs3.priv192.168.100.14forpcs4.priv192.168.100.21fordbmy.priv
-
-
Create a verification sheet for your OVD infrastructure. This should be something you can run quickly and that will confirm for you that OVD still behaves in the way you configured it.
For instance, it can be browsing a specific set of pages in the Admin Console and then starting a session with a test user. You can make it more complex but try to make it so it can be run quickly (10 minutes). As this configuration will impact your production farm, it is important to run this procedure several times during this document to ensure that your OVD configuration has not been damaged before we switch to the next section.
It is highly recommended that you write this plan in a document or on paper so it can be referred to easily.
Chapter I: Create missing resources in the infrastructure
In order to switch from your current OVD farm to a failover configuration, we need to add resources to your infrastructure as explained in the Prerequisites.
Create the new VLAN and subnet
-
Define / Create the
privVLAN on your infrastructure to be used for the cluster's communication.For example, when using VMware as the virtualization layer, create a new portgroup.
-
You might need to adapt some routing in your infrastructure if you want to be able to access this dedicated network from a remote host (SSH). Additionally, VMs in this LAN will require Internet access.
Limit access to the VLAN
Consider a conservative balance between convenient access and restricted areas for the VLAN so its security and reliability are maintained.
Static allocation vs DHCP
In this document, we will use static IP allocation instead of a DHCP in the
priv VLAN because it simplifies the configuration. But you are free to add
a DHCP server to the design. It can actually prove beneficial in regards to
the previous note about routing.
Add a network adapter to your existing Session Manager node (our future osm1)
Your current osm1 host does not have access to the new priv VLAN yet. We
need to reconfigure the virtual machine on the hypervisor to add a network
adapter in this VLAN.
Warning
-
Applying this change requires the virtual machine to shutdown temporarily.
This means you should schedule this operation to not affect your users.
-
Also, depending on your hypervisor and guest OS, there is a chance the new hypervisor NIC will show up as the first guest NIC and vice-versa. If this occurs, this will cause problems because your eth0 no longer has the same MAC address and will not receive the same IP from the DHCP.
For example, with VMware ESXi, this is a matter of
pciSlotNumber. You must make sure that the new NIC has a higher slot than the previous one.
-
Put your Session Manager service into Maintenance Mode and wait until no users are connected
-
Note the current IP address of
osm1and then shutdown theosm1virtual machine -
On the hypervisor, edit the
osm1VM and add a NIC -
Reboot the
osm1VM -
Wait for the VM to start and monitor its IP configuration. Make sure the VM has the same IP address as noted before.
-
Connect to the OVD Administration Console and switch the system back to Production Mode.
If necessary, you may want to keep going with the configuration if your downtime plan still gives you time. In this case, leave the system in Maintenance Mode and continue to the next section.
Create required VMs
We need to provision 4 new virtual machines with the following requirements:
osm2 |
pcs3 & pcs3 |
dbmy |
|
|---|---|---|---|
| # vCPU | Same as osm1 |
1 | 2 |
| # RAM | Same as osm1 |
1GB | 4GB |
| # Disk | Same as osm1 |
15GB | 30GB |
| Network Adapter | 2 NICs | At least 1 NIC on priv VLAN, + anything required for routing |
At least 1 NIC on priv VLAN, + anything required for routing |
| Guest OS | Same as osm1 |
Same as osm1 |
Any supported OS |
After the VMs are created and ready to use, you may want to apply any standard configurations that your organization applies to each node before deploying the OVD Failover configuration.
Configure hostname and network for each node
The following steps must be applied to each of the 5 nodes in your cluster.
Including osm1!
Your existing Production Session Manager (future osm1) is included in
these nodes.
The following steps are not expected to damage the service but proceed with extra caution for this node.
IP address configuration on second NIC
The second NIC will be used for the cluster's dedicated communication. We will set the static IP addresses.
In our example, the IP addresses for the secondary NIC are:
192.168.100.11/24forosm1192.168.100.12/24forosm2192.168.100.13/24forpsc3192.168.100.14/24forpsc4192.168.100.21/24fordbmy
Ubuntu 18.04 LTS (Bionic Beaver) and Ubuntu 22.04 LTS (Jammy Jellyfish)
On Ubuntu Server 18.04, the network configuration is delegated to netplan.
- Edit
/etc/netplan/90_config_eth1.yaml -
Add the following content
network:
  ethernets:
    eth1:
      addresses:
        - 192.168.100.X/24
Warning
Replace
192.168.100.X/24according to your own configuration. -
Reload the system network configuration
Ubuntu 16.04 LTS (Xenial Xerus)
On Ubuntu Server 16.04, the network configuration is done using the interfaces
files.
- Edit
/etc/network/interfaces.d/eth1.conf -
Add the following content
Warning
Replace
192.168.100.Xaccording to your own configuration. -
Reload the system network configuration
RHEL
On RHEL, the network configuration is stored in sysconfig.
- Edit
/etc/sysconfig/network-scripts/ifcfg-eth1 -
Add the following content
Warning
Replace
192.168.100.Xaccording to your own configuration. -
Reload the system network configuration
System Hostname Definition
The hostname and hostname -f commands can tell you the current hostname.
The following instructions explain how to change the hostname according to your plan.
-
Identify your current hostname
-
Set the hostname according to your plan
Warning
Replace
{node_name}according to your own configuration. -
Edit the
/etc/hostsconfiguration file and replace any mentions of the old hostname with the new one
Reconnect your SSH session and run the hostname and hostname -f commands to
verify the hostname configuration.
Internal network names
Edit the /etc/hosts configuration file and make sure it contains the following
entries:
192.168.100.11 osm1.priv
192.168.100.12 osm2.priv
192.168.100.13 pcs3.priv
192.168.100.14 pcs4.priv
192.168.100.21 dbmy.priv
Warning
Replace all entries (IP and names) according to your own configuration.
Verify network configuration and connectivity
Check that the following details are correct before continuing:
-
Show the IP configuration
The result should show both NICs with their IP addresses.
-
Ping all the nodes on the dedicated LAN
-
Ping first OVD Session Manager node
-
Ping second OVD Session Manager node
-
Ping first pacemaker node
-
Ping second pacemaker node
-
Ping database node
-
Chapter II: Deploy osm2 & obtain a valid Subscription Key
This chapter focuses on obtaining an Inuvika subscription key that is valid for both OSM nodes. The subscription keys are restricted to a specific list of Session Manager IDs, so it is important to start with provisioning the second OSM node and obtain a new subscription key once that is up and running.
Deploy a new OVD Session Manager for osm2
In this section, the goal is to provision a new virtual machine to host the second OSM node for our failover setup.
The osm2 node should be as similar as possible to osm1 in terms of
configuration: firewall, remote access credentials, system update, etc...
Install the OVD Session Manager and Administration Console following the Installation and Configuration Guide
Warning
Both osm1 and osm2 are required to have the exact same version
of Inuvika OVD installed.
Also keep in mind that this machine will contain only the OSM and AC. No other components should be installed.
When done, you can connect to this new OVD Administration Console. You should see an empty OVD environment (no servers, no users, no groups).
Session Manager IDs and Inuvika OVD Enterprise subscription key
At this point, you should have 2 different OVD Session Managers and
Administration Consoles: osm1 and osm2.
Connect to both Administration Consoles and go to the Subscription Plan page. You will notice that they do not have the same Session Manager ID. This is because a Session Manager ID is unique to each host.
In order to have a working Session Manager Failover configuration, it is required to have a single Inuvika OVD Enterprise subscription key that is valid for both Session Manager IDs.
Please contact your local Inuvika Reseller Partner in order to initiate a replacement key request for both Session Managers. Provide both Session Manager IDs with your request.
If you are not currently working with an Inuvika Reseller Partner, please contact your Inuvika representative directly, or submit the request form at https://www.inuvika.com/getakey.
Warning
It is possible to keep working in parallel on this configuration, up to Chapter V, while waiting for the subscription key.
However, it will not be possible to finalize the configuration until installing a valid Inuvika OVD Enterprise subscription key valid for both Session Manager IDs.
Install the new subscription key
Once you obtain your replacement key, install it on your Production Session Manager. Install the new key before removing the old one to avoid impacting your production.
Chapter III: Switch osm1 configuration to use dbmy as database
The OSM stores part of its data in a MySQL database installed locally (default configuration). For the HA service, we need multiple OSMs to use the same shared database. This means the database can no longer be local on each OSM so a dedicated MySQL server will be required. Later in this document, we will copy the database from your OSM to this dedicated MySQL server.
In this section, we are going to move the database of your existing Session Manager node to a dedicated host.
Deploy the dbmy node
If your infrastructure already provides a MySQL service, it is highly recommended to use it instead of creating a new one. If this is the case, you can skip the next section.
Run the following commands on the dbmy node only.
-
Install MySQL
-
Ubuntu LTS
-
RHEL
-
Install the required packages
-
For RHEL 8
-
For RHEL 7
-
-
Enable the service
-
Start the service
-
-
-
Set the MySQL root password
-
Ensure the MySQL service allows connections from your LAN
-
Edit the
/etc/mysql/configuration file and comment out any line withbind-address -
Restart the service
-
Ubuntu LTS
-
RHEL
-
-
-
Configure the firewall to allow incoming traffic on port
TCP 3306
Create a database and user for OVD
From the dbmy node, apply the following instructions:
-
Open a MySQL shell:
-
Create a database
-
Create a user
Warning
Replace
[ovd_password]with a secure password for this user -
Allow the user to operate on the database
-
Reload MySQL configuration and exit the session
Switch the Session Manager database
In this section, we are going to copy the Session Manager database to our new dedicated MySQL server.
During this operation, the Session Manager will be unavailable.
Warning
The following instructions must be executed on osm1.
In this example, the database can be reached at dbmy.priv.
-
Check MySQL connectivity with the new database server
-
Disable the Session Manager service on
osm1 -
Export the local database on
osm1 -
Import the local OVD database to our new database host
-
Stop and disable the MySQL service on
osm1-
Ubuntu LTS
-
RHEL
-
-
Copy the Session Manager backup configuration file on
osm1 -
Edit the
~/session-manager.confonosm1and change the following items according to your configuration:general.sql.host:dbmy.privgeneral.sql.user:ovdgeneral.sql.password:[ovd_password]
Warning
This configuration file is using the JSON format. Make sure that your changes don't break the file format. For instance:
-
Enable the Session Manager service on
osm1-
Ubuntu LTS
-
RHEL
-
At this point, your Session Manager should be back online with the exact same configuration as when we disabled it.
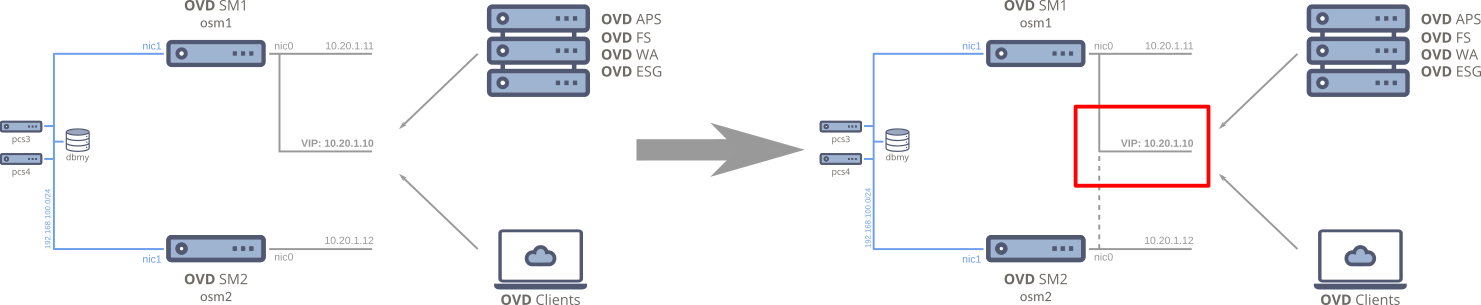
Chapter IV: Change the OSM access point to use the Virtual IP Address
In this section, we are going to reconfigure your OVD farm so all components will use the virtual IP address to communicate with the Session Manager instead of its regular one.
Warning
This step requires you to switch the OVD farm to Maintenance Mode and ensure no sessions are running.
This will be the final downtime period for osm1.
Prepare the VIP-src service
On both the osm1 and osm2 nodes:
-
Install the iptables package
-
Ubuntu LTS
-
RHEL 8
-
RHEL 7
-
-
Open
/etc/systemd/system/cluster-vip-src.serviceand add the following content:[Unit] Description=Enable source IP rewrite to match with the VIP [Service] Type=oneshot RemainAfterExit=yes EnvironmentFile=/etc/default/cluster-vip-src ExecStart=/sbin/iptables -t nat -I POSTROUTING -o ${NIC} -d ${ADDRESS} -j SNAT --to-source ${VIRTUAL_IP} ExecStop=/sbin/iptables -t nat -D POSTROUTING -o ${NIC} -d ${ADDRESS} -j SNAT --to-source ${VIRTUAL_IP} [Install] WantedBy=multi-user.target -
Open
/etc/default/cluster-vip-srcand add the following content:# Configuration of the *cluster-vip-src* service # # You must configure the following variables: # NIC # # Set the name of the Network Interface Controller (NIC) where the # virtual IP address will be added. # NIC=eth0 # VIRTUAL_IP # # Example: 10.20.1.10 # VIRTUAL_IP= # ADDRESS # # List all subnets where you want the virtual IP address to be used for # outgoing traffic. # # So all OVD OAS, OFS and ESG servers are required to be listed here. # # Comma separated list # CIDR notation to describe IP or subnet # ADDRESS=0.0.0.0/0Warning
You must fill the
VIRTUAL_IPvariable in this configuration file according to your own setup.The
NICvalue should be changed accordingly.You may also change the
ADDRESSvariable if you want to control which virtual IP address is used for outgoing packets.
Apply the VIP on osm1
The following instructions must be executed on osm1 only.
-
Switch the OSM service to Maintenance Mode through the AC and ensure no sessions are running.
-
Set the VIP
Warning
Replace
10.20.1.10/24according to your configuration. -
Start the cluster-vip-src service
Note
Note that we do not enable the service here. In general we do not want to manually enable services as Pacemaker is in charge of stopping and starting the service when required.
-
Depending on whether you are using DNS names for resolving server names or IP addresses:
-
If using DNS: update the record of the OSM access point to target the VIP instead of the
osm1IP -
If using IP:
-
For all Linux OAS, OFS, ESG, OWA servers:
- Edit
/etc/ovd/slaveserver/slaveserver.conf - Locate the
session_managersetting in the[main]section - Replace the osm host with the VIP
- Restart the OVD service
- Check that the servers are back online in the Admin Console
Warning
For the OWA on OVD version < 3.3.0 edit
/etc/ovd/web-access/config.inc.phpinstead and replace the osm host with the VIP - Edit
-
For all Windows OAS:
- Open the registry key
HKEY_LOCAL_MACHINE\SOFTWARE\OVD\SlaveServer - Locate the
session_managersetting - Replace the osm host with the VIP
- Restart the OVD service
- Check that the servers are back online in the Admin Console
- Open the registry key
-
If you have an external / dedicated AC node, edit
/etc/ovd/administration-console/config.inc.phpand replace the osm host with the VIP
-
-
-
Switch the OSM back to Production Mode.
Verify your OVD infrastructure
Everything is now in place in terms of network and nodes. The next chapter will describe how to create the actual cluster.
Before proceeding, you should monitor your OVD environment to make sure everything is working as we have changed both the database and the OSM address:
- All registered servers are UP in the Admin Console
- Users are able to connect as normal
- System logs don't show any warnings/errors
After this step, it is not expected for the Session Manager to be unavailable for more than a few seconds.
Not reboot safe
The configuration we just deployed is not safe over a reboot of osm1.
Deploying the VIP now simplifies the next section and prevents any
additional maintenance periods. But if, for any reason, osm1 is rebooted
before the setup is finalized, the OSM service will not be functioning.
Chapter V: Prepare everything necessary for the cluster
Before we can create the cluster, we must prepare the cluster's resources.
Make each OSM node aware about the other one
Run the following instructions on each OSM node:
-
Open the
/etc/hostsconfiguration file -
Identify the line defining the opposite OSM node
Typically
osm2.privif you are editing the file onosm1;osm1.privotherwise. -
Add
the-other-osmat the end of the line -
Save an exit
Both OSM nodes can now address the other one with the name the-other-osm. You
can test it with a ping as an example.
Configure password-less SSH communication between the OSM nodes
In order for data synchronization to work seamlessly, both nodes must be configured to authorize each others' SSH key.
-
On the
osm1server-
Generate an SSH key pair
-
Show the newly created public key
The key should look something like:
-
Copy the key to a text editor as we will use it shortly in
osm2
-
-
On the
osm2server-
Create the /root/.ssh folder:
-
Open /root/.ssh/authorized_keys and paste the following content
from="{IP_OSM1}",no-pty,no-user-rc,no-agent-forwarding,no-port-forwarding,no-X11-forwarding {PUB_KEY_OSM1}Warning
-
Replace
{IP_OSM1}with the IP address ofosm1in the dedicated LAN (you can use the name instead ofosm1.privbut only if your SSH server is configured with theUseDNSsetting) -
Replace
{PUB_KEY_OSM1}with the public key we copied to a text editor fromosm1.
-
-
Initialize the SSH trust with
osm1 -
Generate an SSH key pair
-
Show the newly created public key
-
Copy the key to a text editor as we will use it shortly in
osm1
-
-
On the
osm1server-
Open /root/.ssh/authorized_keys and paste the following content
from="{IP_OSM2}",no-pty,no-user-rc,no-agent-forwarding,no-port-forwarding,no-X11-forwarding {PUB_KEY_OSM2}Warning
-
Replace
{IP_OSM2}with the IP address ofosm2in the dedicated LAN -
Replace
{PUB_KEY_OSM2}with the public key we copied to a text editor fromosm2
-
-
Initialize the SSH trust with
osm2
-
Verifying the SSH Configuration
To verify password-less SSH communication works between both nodes, run the following instructions:
-
On the
osm1server-
Disable any potential SSH agent that could fake this test
-
Send the hostname file to the other OSM node
The expected result is to not be prompted for any credentials or configurations and have the
scpcommand not return any errors.
-
-
On the
osm2server-
Confirm the file has been received
-
Delete the received file
-
Disable any potential SSH agent that could fake this test
-
Repeat the test in reverse
The expected result is to not be prompted for any credentials or configurations and have the
scpcommand not return any errors.
-
-
On the
osm1server-
Confirm the file has been received
-
Delete the received file
-
Configuring data synchronization between the 2 nodes
In addition to the MySQL database, OVD Session Managers store information on the local disk.
So we must configure a mechanism to synchronize the disk data between the 2 nodes to prevent any loss of data.
In addition to the Session Manager disk data, we also want to synchronize the PHP sessions between both nodes to prevent users' sessions from being disconnected during an outage.
The following instructions must be executed on both osm nodes.
-
Install the lsyncd software package
-
Ubuntu LTS
-
RHEL 8
-
RHEL
-
-
Create the lsyncd configuration folder
-
Fixup missing packaging
-
Ubuntu LTS
-
Create the
/etc/systemd/system/lsyncd.serviceconfiguration file with the following content: -
Reload the
systemdconfiguration
-
-
RHEL
- Edit the
/etc/sysconfig/lsyncdconfiguration file and ensure that the following line is present
- Edit the
-
-
Edit the
/etc/lsyncd/lsyncd.conf.luaconfiguration file and copy the following content:-
Ubuntu LTS
host = "the-other-osm" folders = { "/var/spool/ovd/session-manager", "/etc/ovd/session-manager", "/var/lib/php/sessions", } settings { logfile = "/var/log/lsyncd.log", insist = true, } for _, folder in ipairs( folders ) do sync { default.rsyncssh, source = folder, host = host, targetdir = folder, exclude = {'.*'}, rsync = { archive = true, prune_empty_dirs = true, _extra = {'--rsh=ssh -i /root/.ssh/sync_rsa'}, }, ssh = { identityFile = '/root/.ssh/sync_rsa', }, } end -
RHEL
host = "the-other-osm"
folders = {
    "/var/spool/ovd/session-manager",
    "/etc/ovd/session-manager",
    "/var/lib/php/session",
}

settings {
    logfile = "/var/log/lsyncd.log",
    insist = true,
}

for _, folder in ipairs( folders )
do
    sync {
        default.rsyncssh,
        source    = folder,
        host      = host,
        targetdir = folder,
        exclude   = {'.*'},
        rsync     = {
            archive  = true,
            prune_empty_dirs = true,
            _extra = {'--rsh=ssh -i /root/.ssh/sync_rsa'},
        },
        ssh = {
            identityFile = '/root/.ssh/sync_rsa',
        },
    }
end
-
-
Create the
/etc/lsyncd/lsyncd.cronconfiguration and paste the following content:
Apache HTTP server
This configuration requires that only one Apache server run in the cluster.
The following instructions must be executed on both osm nodes.
-
Only for EL7
-
Edit the
/etc/httpd/conf.d/status.confApache configuration file -
Add the following content:
-
Reload the Apache service
-
-
Install the wget package
-
Ubuntu LTS
-
RHEL 8
-
RHEL 7
-
Install Pacemaker
The following configuration must be applied on both OSM nodes and both PCS nodes.
-
Install the package
-
Ubuntu 18.04 LTS / Ubuntu 16.04 LTS
-
Ubuntu 22.04 LTS
-
RHEL 7
-
RHEL 8
-
-
Enable the
pcsdservice -
Start the
pcsdservice -
Delete any default cluster
-
For EL7 only
-
Set
haclusterpasswordWarning
Set the same password on all 4 nodes and remember it as we will need it later.
Firewall and Ports
Pacemaker requires several network ports to be open for both Incoming & Outgoing traffic:
TCP 2224TCP 3121UDP 5405TCP 9929,UDP 9929
Apply the following configuration:
-
On RHEL using firewalld:
-
Add a new rule
-
Add an additional rule to make the change permanent
-
-
On Ubuntu LTS, using ufw:
-
Create a rule for the TCP ports:
-
Create a rule for the UDP ports:
-
Shutdown OVD on osm2 and prepare it to become a replica of osm1
The following instructions must only be applied on osm2.
-
Stop the Apache service
-
Ubuntu LTS
-
RHEL
-
-
Remove the OSM cron
-
Stop and disable the MySQL service
-
Ubuntu LTS
-
RHEL
-
Chapter VI: Create and configure the cluster
Now we are ready to create the cluster.
Create a cluster gathering osm1 and both pcs nodes
Run the following instructions on osm1 only.
-
Activate authentication with other nodes
-
Ubuntu 22.04 LTS
-
RHEL / Ubuntu 18.04 LTS / Ubuntu 16.04 LTS
-
-
Create the cluster
-
Ubuntu 22.04 LTS
-
RHEL / Ubuntu 18.04 LTS / Ubuntu 16.04 LTS
ovd-sm: name of the clusterNote
You will notice that
osm2is not listed here. This is completely normal. We do not want to bring it into the cluster for now. -
-
Start the cluster
-
Disable STONITH / fencing
-
Verify the status of your cluster by using the following command
The result should look like this:
Cluster name: ovd-sm
Stack: corosync
Current DC: osm1.priv (version 1.1.18-2b07d5c5a9) - partition with quorum
Last updated: Tue Dec  3 00:47:15 2019
Last change: Tue Dec  3 00:46:28 2019 by root via cibadmin on osm1.priv

3 nodes configured
0 resources configured

Online: [ osm1.priv pcs3.priv pcs4.priv ]

No resources


Daemon Status:
corosync: active/disabled
pacemaker: active/disabled
pcsd: active/enabled
Create the cluster resources
In this section, we are going to define what resources the cluster needs to host the OVD Session Manager.
The following instructions must be executed on only one cluster node (either
osm or pcs).
Virtual IP Address
-
Configure
pcs3.privandpcs4.privto host OVD resources -
Add the VIP as a resource in the cluster
Warning
Replace
{CIDR}with your virtual IP address.You might need to change the
cidr_netmaskdepending on your LAN. -
Create a resource for the cluster-vip-src service
-
Add the constraints to the VIP
-
Ubuntu 22.04 LTS
-
RHEL / Ubuntu 18.04 LTS / Ubuntu 16.04 LTS
-
CRON
-
Create the resource in the cluster:
-
Add the constraints to the VIP
-
Ubuntu 22.04 LTS
-
RHEL / Ubuntu 18.04 LTS / Ubuntu 16.04 LTS
-
Apache HTTP server
-
Add Apache as a resource in the cluster
-
For Ubuntu 16.04 LTS (Xenial Xerus)
-
For Ubuntu 22.04 LTS (Jammy Jellyfish), Ubuntu 18.04 LTS (Bionic Beaver), and RHEL
-
-
Add the constraints to the VIP
-
Ubuntu 22.04 LTS
-
RHEL / Ubuntu 18.04 LTS / Ubuntu 16.04 LTS
-
lsyncd service
-
Create the Pacemaker resource
-
Add the constraints to the VIP
-
Ubuntu 22.04 LTS
-
RHEL / Ubuntu 18.04 LTS / Ubuntu 16.04 LTS
-
-
Enable the resource
-
Create another resource
-
Attach the resource to
lysncd-
Ubuntu 22.04 LTS
-
RHEL / Ubuntu 18.04 LTS / Ubuntu 16.04 LTS
-
-
Start this resource
Verify we have all resources showing in PCS
You can verify the status of your cluster by using the following command:
The result should look like this:
Cluster name: ovd-sm
Stack: corosync
Current DC: osm1.priv (version 1.1.18-2b07d5c5a9) - partition with quorum
Last updated: Tue Dec  3 01:15:00 2019
Last change: Tue Dec  3 01:14:10 2019 by root via cibadmin on osm1.priv

3 nodes configured
6 resources configured

Online: [ osm1.priv pcs3.priv pcs4.priv ]

Full list of resources:

virtual_ip     (ocf::heartbeat:IPaddr2):  Started osm1.priv
virtual_ip_src (systemd:cluster-vip-src): Started osm1.priv
osm_cron       (ocf::heartbeat:symlink):  Started osm1.priv
httpd          (ocf::heartbeat:apache):   Started osm1.priv
lsyncd         (systemd:lsyncd):          Started osm1.priv
lsyncd_cron    (ocf:heartbeat:symlink)    Started osm1.priv
Following this step, we should now never have to put the service down.
Check the status of your OVD farm again
The next step will be to add osm2. But before doing that, you should verify
your OVD environment according to your verification sheet.
Add osm2 to the cluster
Run the following instructions on osm1 only.
-
Add
osm2to the cluster -
Verify the status of your cluster by using the following command
The result should look like this:
Cluster name: ovd-sm
Stack: corosync
Current DC: osm1.priv (version 1.1.18-2b07d5c5a9) - partition with quorum
Last updated: Tue Dec  3 01:17:10 2019
Last change: Tue Dec  3 01:16:02 2019 by hacluster via crmd on osm1.priv

4 nodes configured
6 resources configured

Online: [ osm1.priv osm2.priv pcs3.priv pcs4.priv ]

Full list of resources:

virtual_ip     (ocf::heartbeat:IPaddr2):  Started osm1.priv
virtual_ip_src (systemd:cluster-vip-src): Started osm1.priv
osm_cron       (ocf::heartbeat:symlink):  Started osm1.priv
httpd          (ocf::heartbeat:apache):   Started osm1.priv
lsyncd         (systemd:lsyncd):          Started osm1.priv
lsyncd_cron    (ocf:heartbeat:symlink)    Started osm1.priv

Daemon Status:
corosync: active/disabled
pacemaker: active/disabled
pcsd: active/enabled
Verification and conclusion
The configuration is now done. Your farm is expected to be fully working.
Refer back to your verification sheet and ensure your OVD farm is functioning as expected.
The next chapter does not need to be followed immediately, but it is necessary in order to validate the full configuration.
Chapter VII: Test the failover switch
In order to verify that the full failover configuration works, this section
documents how to switch the virtual IP address and other cluster resources from
osm1 to osm2.
Warning
It is highly recommended to carry out this test during a period where only a small number of users are connected to your OVD farm, especially if this is the first time you are testing the failover.
This operation carries risk and if anything is not configured properly, this will lead to a non-working OVD environment!
-
Connect to both osm nodes via SSH and run the following command
Note
For this example, we will assume that cluster resources are hosted on
osm1.priv. -
From a different SSH connection on one osm node, order the switch to
osm2.priv -
Monitor the
pcs statusscreens. You should see all resources switching fromosm1.privtoosm2.privwithin 10 seconds.The result should look like this:
Cluster name: ovd-sm Stack: corosync Current DC: osm1.priv (version 1.1.18-2b07d5c5a9) - partition with quorum Last updated: Tue Dec 3 01:21:44 2019 Last change: Tue Dec 3 01:21:22 2019 by root via crm_resource on pcs3.priv 4 nodes configured 6 resources configured Online: [ osm1.priv osm2.priv pcs3.priv pcs4.priv ] Full list of resources: virtual_ip (ocf::heartbeat:IPaddr2): Started osm2.priv virtual_ip_src (systemd:cluster-vip-src): Started osm2.priv osm_cron (ocf::heartbeat:symlink): Started osm2.priv httpd (ocf::heartbeat:apache): Started osm2.priv lsyncd (systemd:lsyncd): Started osm2.priv lsyncd_cron (ocf:heartbeat:symlink) Started osm2.priv Daemon Status: corosync: active/disabled pacemaker: active/disabled pcsd: active/enabled -
Browse the OVD Administration Console via the virtual IP address. Expected behavior: no change from before the switch. Go to the Subscription Plan page and verify that the OSM ID has switched to that of
osm2, proving the VIP is targetingosm2now.
At this step you should again verify that your OVD infrastructure is fully functional according to your verification sheet.
Congratulations! You have reached the end of the document and now have a functional Session Manager Failover configuration.
Appendix 1: Troubleshooting
This section will help you to troubleshoot your setup both during and after the installation.
Pacemaker
As a reminder, Pacemaker is the service that manages the cluster. It communicates across the 4 nodes (osm and pcs nodes).
To check the status of the cluster, you can run the following command on any of the 4 nodes:
When the cluster seems to be having problems, it is a good idea to run the
command in a watch and on multiple nodes at once.
Resource cleanup
In the case where a Pacemaker resource is not be able to recover after some sort of crash or error, it can help to order a cleanup on the resource:
Replace {resource_name} with the resource that has the problem.
Ex: lsyncd_cron.
Virtual IP Address
Despite the Pacemaker status, you may want to have a deeper look at the VIP.
Incoming traffic
-
Check the IP configuration on both OSM nodes
On the active node, the result should show both the regular node address and the VIP:
2: eth0: <BROADCAST,MULTICAST,UP,LOWER_UP> mtu 1500 qdisc pfifo_fast state UP group default qlen 1000
    link/ether 00:0c:29:d7:90:a2 brd ff:ff:ff:ff:ff:ff
    inet 10.20.1.11/24 brd 10.20.1.255 scope global eth0
    valid_lft forever preferred_lft forever
    inet 10.20.1.10/24 brd 10.20.1.255 scope global secondary eth0
    valid_lft forever preferred_lft forever
Whereas on the passive node, the virtual IP address should not be shown
-
From anywhere in the
ovd-srvVLAN, SSH to the virtual IP address. You should obtain a shell on the master node.
Outgoing traffic
Verify that outgoing packets use the virtual IP address
-
Run the following command from any Linux node in the
ovd-srvVLAN (OVD Linux OAS, OFS, ESG will do)Info
Make sure to open the
TCP 8080port on your firewall for this test. -
Connect to the NC server from the OSM active node
Info
Replace
{node_ip}with the IP of the node that runs the NC server -
Back on the NC server, you should see:
10.20.1.10 should be your VIP and not the regular IP of the OSM node.
Lsyncd
Lsyncd is the service that ensures data synchronization between the 2 OSM nodes. If you suspect there are any issues with this service, here are few checks you can do:
-
Check the service status
The expectation here is that the service is running on the active node and stopped on the passive one. If this is not the case, you should compare this information with the Pacemaker resource status.
-
Check the log file:
/var/log/lsyncd.logThis is useful to see if any errors have been raised by the service.
-
Run
lsyncdin foregroundThis is useful to understand why the service would stop.
Appendix 2: Optional configuration
The following subsections describe extra configurations that you may be interested in deploying on top of your Session Manager Failover setup. These are not mandatory.
Uninstall MySQL from OSM nodes
Once the Session Manager Failover setup is fully operational, we can uninstall the local MySQL service installed on both OSM nodes.
The service is not running and the OSM nodes will be using the dedicated
database (ex: dbmy.priv) so there is no need for the local ones.
Run the following command on both OSM nodes:
-
Ubuntu LTS
-
RHEL 8
-
RHEL 7
Warning
Be careful to not run this command on the dbmy.priv node as it would break
your production environment.
Configure email notifications
You may want to be notified if Pacemaker detects anything and starts switching resources to a different node.
This section will describe a very simple way to do this using email. This can be extended to a more sophisticated notification mechanism, but we will only cover the basics here.
This will require credentials for an SMTP account.
-
On each OSM node and each pcs node
-
Install
ssmtp-
Ubuntu LTS
-
RHEL 8
-
RHEL 7
-
-
Edit the
/etc/ssmtp/ssmtp.confconfiguration file and fill the following fields according to your SMTP configuration:- mailhub
- UseSTARTTLS
- AuthUser
- AuthPass
-
Verify the configuration
Check your emails to see if this test has been received.
-
Edit the
/usr/local/sbin/pcs-notifyconfiguration file and fill it with the following content#! /bin/bash EMAIL=your.email@address ssmtp $EMAIL <<EOF Subject: [WARNING] Pacemaker alert sent by $(hostname -f) Hi, This is an alert trigger by Pacemaker on $(hostname). You should connect to your cluster and review the nodes, resources, and logs. Additional information given by pacemaker: $(env | grep ^CRM_ | sort) -- kind robot EOFWarning
Replace
your.email@addresswith a valid email address you want to send notifications to. -
Make the script executable
-
-
On only one Pacemaker node
-
Define the editor you want to use to edit the Pacemaker configuration
-
Open the cluster configuration
-
Locate the
<configuration>XML node -
Inside the
<configuration>node, add the following XML configuration -
Save & exit
-
Pacemaker will execute your script each time it wants to raise an alert and it will potentially do that on multiple nodes.
Warning
This may lead to a lot of emails if Pacemaker has a lot of alerts.
Appendix 3: Update OVD version
This section describes the procedure of updating the OVD version of a deployed and running Session Manager Failover setup.
Note
In this example, we define the active node as osm1 and the passive node as
osm2.
Before you run this procedure, check pcs status to make sure you know
which node is active and which node is passive.
-
Put the passive OSM node in standby with PCS
-
On the active OSM node:
-
Update OVD following the official instruction from the version's Release Notes.
-
Restart the Apache resource
-
Ensure your OVD farm is fully functional according to your verification sheet.
-
-
On the passive OSM node:
-
Disable the OVD configuration
-
Update OVD following the official instruction from the version's Release Notes.
-
Remove the OVD cron file
-
Re-enable the OVD configuration
-
-
Put the passive OSM node back in production with PCS
The osm nodes are now deployed with the newer OVD version.
Make sure you update the rest of your OVD infrastructure to the appropriate
version.
Schedule a failover switch
It is recommended to test the failover switch after updating the OVD version.
Please schedule this operation and follow the Test the failover switch chapter.