Active Directory SSO Using Kerberos
Preface
This document explains the steps to implement a Single Sign-On for users of Inuvika OVD with a Microsoft Active Directory integration using Kerberos.
Introduction
Active Directory and Kerberos Auth Method
The Kerberos authentication protocol provides a mechanism for authentication - and mutual authentication - between a client and a server, or between one server and another server.
Microsoft's Active Directory is an implementation of a Kerberos authentication realm. Kerberos enabled servers with the authentication realm will allow users to sign-in to Windows workstations that are joined to the Microsoft Domain and to access resources in that domain. A user does not need to provide the authentication credentials again once signed-in. This is known as Microsoft Single Sign-On (SSO).
A detailed overview of Microsoft and Kerberos authentication can be found at the Microsoft kerberos authentication guide.
Understanding Kerberos Concepts
The Kerberos authentication protocol is standard on all versions of Windows. A typical Kerberos implementation consists of 3 server entities:
- Key Distribution Center (KDC) which typically is installed on the Domain Controller (the primary Microsoft Active Directory server);
- A client workstation that is a part of the domain; and
- A server with the desired service to access.
An overview of a typical Kerberos workflow can be found at the Microsoft kerberos guide
OVD and SSO
The default Inuvika OVD authentication method requires a login and password and uses the internal MySQL database to store the user credentials. OVD can also be configured to use external authentication services such as LDAP and Microsoft Active Directory.
A Single Sign-On mechanism aims to authenticate a user only once on a secure authorization platform and then connect the user to the various external resources by re-using the credentials. OVD is compatible with several SSO solutions , such as SAML2.
Integrating OVD with Active Directory SSO will provide users a way to login to an OVD session without sharing any login details; instead, the credentials previously delivered by Active Directory during the initial authentication process, will be re-used. The following sections describe the configuration process that enables OVD to use SSO with Active Directory.
Related Documentation
The following OVD Enterprise documentation is available:
Prerequisites
Server Environment
The server environment must include a Microsoft Domain Controller as well as a typical OVD server farm.
The Microsoft Domain Controller (DC) must have the following characteristics:
- Active Directory is installed and functional
- DNS Server is installed and functional
- Configured as an NTP host server
- Microsoft functional level 2008R2, or 2012R2
The OVD server farm must be able to access the Domain Controller and vice-versa. The OVD farm consists of the following:
- A server that has the OVD Session Manager, Web Access and Admin Console
- An OVD Application Server (ApS), either Windows or Linux or both
- An OVD File Server (OFS)
Note
- If OVD was configured to use the internal authentication method, any publications will need to recreated after changing the authentication method.
- It is important to perform backups of your running OVD farm and Microsoft Active Directory server prior to executing any integration steps outlined from this point onwards. It is preferable to test your integration by cloning the servers or to re-create a new isolated environment so that you can conduct comprehensive testing of the OVD SSO integration. An isolated environment is required so that your production environment will not recognize the cloned Domain Controller to avoid any negative Domain Controller policy propagation.
- The ApS and OFS cannot be installed on the same server as the Session Manager. There will be a configuration conflict otherwise which will prevent the system from working correctly.
- All passwords are case sensitive
Session Manager IP Configuration
The Session Manager IP address may be established either by using DHCP or by using a static IP configuration. In the case that a DHCP configuration is used and the DHCP service is not provided by the Active Directory server, the following must be ensured:
- The DHCP server must always provide the same IP to the Session Manager (MAC address match)
- The DHCP server must provide the Session Manager with the IP address of the active Directory server as the primary DNS server
It is highly recommended to perform the above steps before proceeding further in the documentation.If it is not possible to validate the above steps then a possible workaround is to configure the Session Manager with a static IP address.
Workstation and Domain Account
SSO integration requires that the user login with a user account managed by Microsoft Active Directory and also that the workstation is joined to the domain.
Client Compatibility
The SSO feature is compatible with OVD clients running on a Windows workstation that is joined to the Active Directory domain. SSO is compatible with the OVD Enterprise Desktop Client and OVD Web Access clients using a Windows workstation. It is not compatible with the Enterprise Mobile Client (Android, iOS) or the Enterprise Desktop Client on Linux and Mac platforms or the Web Access clients running on Linux or Mac.
Integrating Microsoft Active Directory with OVD
OVD must be configured to use the Active Directory authentication method. Please refer to the Microsoft Active Directory Integration Guide for detailed instructions. For information about the "Domain Integration Settings" in the OVD Administration Console, please refer to the OVD Administration Guide. In the User Session Configuration section of the configuration page, ensure that the Full OVD integration option is selected. Neither the Hybrid integration nor the Full Active Directory integration options are compatible with Single Sign-On.
After changing the authentication method, users must be assigned to the relevant user groups and publications created so that they can create a session. Session Data and user profiles that were created when Internal Authentication was enabled will no longer be accessible after switching to Active Directory.
After creating the publications, verify that users can create access OVD correctly by having them login in and confirm that they see the same applications as before the modifications for Active Directory.
Network Overview
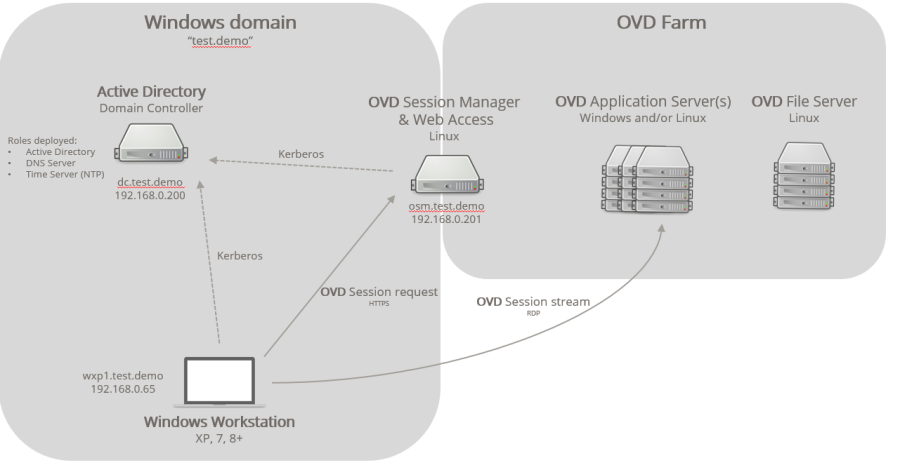
In order to use Kerberos with the OVD Session Manager, the firewall must be configured to allow authentication. Refer to Firewall and Ports for instructions.
Note
In the figure above and throughout the example, the Microsoft Domain
Controller is dc.test.demo and Session Manager is osm.test.demo.
The Windows domain is test.demo.
Session Manager Configuration
The Session Manager support for Windows SSO is based on using Samba to
manage the Kerberos keytab, which is a file containing pairs
of Kerberos principals and encrypted keys, and the krb5-user software
which provides basic programs to authenticate using MIT Kerberos. The
following sections describe how to setup Samba on the Session Manager
server to provide this capability.
FQDN and DNS Compatiblity
Windows Kerberos requires the use of Fully Qualified Domain
Name (FQDN), it will not work with IP addresses. Each server in a Kerberos
authentication realm must be assigned a FQDN that is forward-resolvable.
The Kerberos protocol also expects the server's FQDN to be
reverse-resolvable. The reverse and forward lookup for a FQDN can be
tested using the nslookup command.
System Hostname Definition
Before proceeding, make sure that the Session Manager server is configured correctly by entering the following commands and checking that the response is as expected:
hostname- the expected response isosmhostname -f- the expected response isosm.test.demo
If either of the responses is not as expected, follow the steps below to correct the configuration and then retest:
- Make sure the system hostname is defined correctly (osm) and does
not contain the network/domain name (test.demo) by editing the file
/etc/hostnameto defineosmas hostname. -
Edit the
/etc/hostsfile and ensure it contains the following lines, using the IP address and Session Manager FQDN applicable to your environment: -
If you made any modification to the hostname configuration file or the
/etc/hostsfile, please reboot your server. - After reboot make sure the expected response is obtained for the
hostnameandhostname -fcommands
Note
When configuring the hostname for your environment, the domain specified in the hostname should be the Windows domain name defined by the Active Directory Domain Controller.
Active Directory DNS
Using the DNS server that is provided on the Active Directory server simplifies the requirements for FQDN when using Kerberos. To check that the DNS server is working correctly, perform the following steps:
-
Open the
/etc/resolv.conffile on the Session Manager server and ensure that the name server is the Domain Controller's IP address. If not then:- For a DHCP configuration, go to section Session Manager IP Configuration and check the configuration is correct.
- For a static IP configuration, change the system primary DNS to
be the Active Directory Domain controller IP. For further
information refer to the Static IP Address
Configuration section.
nameserver 192.168.0.200
search test.demo
-
Save the file and verify that the name resolution works.
Time Synchronization
Time Synchronization is critical for Kerberos authentication to work. Please follow the Time Synchronization documentation.
Install and Configure Kerberos
On the Session Manager server, install and configure the Kerberos
package called Krb5-user. Then configure Kerberos to authenticate in the
Active Directory domain.
-
Install the Kerberos package
-
For Ubuntu
-
For RHEL 8
-
For RHEL 7
-
-
Backup the Kerberos configuration file
-
Create a new file called
/etc/krb5.confand copy & paste the following lines into the file:[libdefaults] default_realm=TEST.DEMO kdc_timesync = 1 ccache_type = 4 forwardable = true proxiable = true fcc-mit-ticketflags = true default_keytab_name = FILE:/etc/krb5.keytab [realms] test.demo = { kdc = dc.test.demo master_kdc = dc.test.demo admin_server = dc.test.demo default_domain = test.demo } [domain_realm] test.demo = TEST.DEMO [logging] kdc = FILE:/var/log/krb5/krb5kdc.log- Replace
dc.test.demoby the FQDN of the Domain Controller of your Active Directory domain - Replace
test.demoby the Active Directory domain name - Replace
TEST.DEMOby the Active Directory domain name in upper case characters
- Replace
-
Create log directory
/var/log/krb5and empty log files:-
Create a directory
-
Create an empty log file
/var/log/krb5/krb5kdc.log -
Create an empty log file
/var/log/krb5/kadmind.log
-
Verification
To verify that the installation and configuration were successful,
perform the following test using kinit:
Note
You can use any Active Directory account for the test with or without the realm (user or user@DOMAIN). In the above example, the user is john.
Check that the Ticket Granting Ticket (TGT) is correctly configured by using the following commands:
Information similar to that shown below should be displayed:
Ticket cache: FILE:/tmp/krb5cc_0
Default principal: john@TEST.DEMO

Valid starting Expires Service principal
07/20/15 16:08:51 07/21/15 02:08:54 krbtgt/TEST.DEMO@TEST.DEMO
renew until 07/21/15 16:08:51
In order to destroy the active TGT, enter the following command:
Joining the Domain
The next step is to install and configure Samba so that the Session Manager server can be added to the Active Directory domain using Kerberos.
-
Install the Samba package
-
For Ubuntu
-
For RHEL 8
-
For RHEL 7
-
-
Take a backup of the samba configuration file
smb.conf, using the command below: -
Create a new
/etc/samba/smb.conffile and copy/paste the following lines into it:[global] netbios name = osm realm = TEST.DEMO security = ADS encrypt passwords = yes password server = dc.test.demo workgroup = TEST kerberos method = dedicated keytab dedicated keytab file = /etc/krb5.keytab- Replace the
osmnetbios name by your netbios name. - Replace
dc.test.demoby the FQDN of the Domain Controller of your Active Directory domain - Replace
TEST.DEMOby your Active Direcory domain in upper case characters - Replace
TESTby your Active DirectoryNetbiosname in upper case characters
- Replace the
-
Join the Session Manager server to the domain using the net ads join command with a domain administrator user (a user that has rights to add computers and users to the domain) by entering the command below:
-
Enter the administrator's password
-
Test the configuration using the following command:
-
After performing that command, the computer is joined to the domain, and the SM server is now added as a computer object in Active Directory.
Note
If the user wants to further verify the system is working, use the following command:
Output similar to that shown below should be displayed:
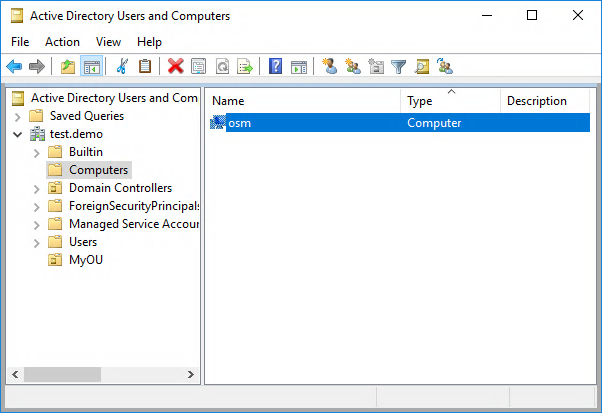
Active Directory Users and Computers
The Session Manager must be configured in the Domain Controller so that it can be trusted for use with Kerberos. On the Domain Controller, open the Active Directory Users and Computers console.
-
Locate the osm object
-
Right-click on the osm object to display the menu options for that object and select Properties
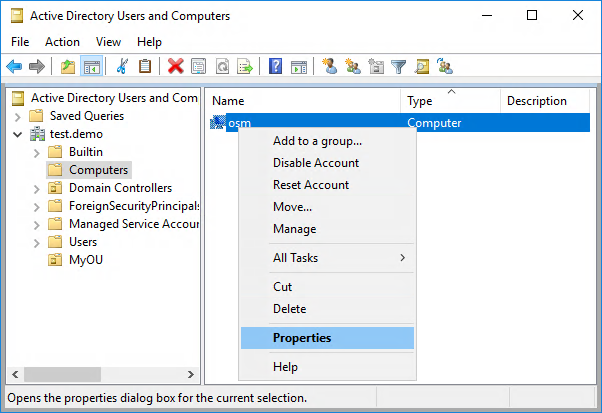
-
In the Properties dialog, click on the Delegation tab.
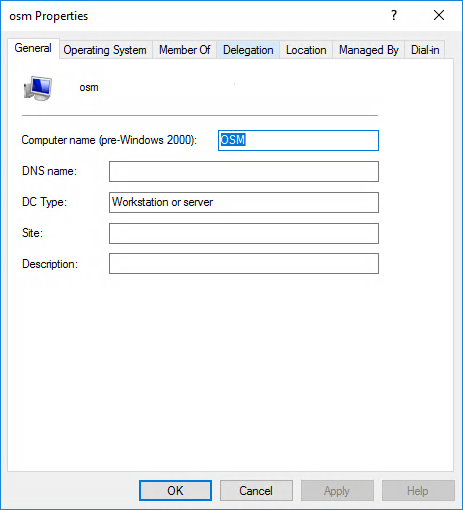
-
In the Delegation dialog, choose Trust this computer for delegation for any service (Kerberos only).
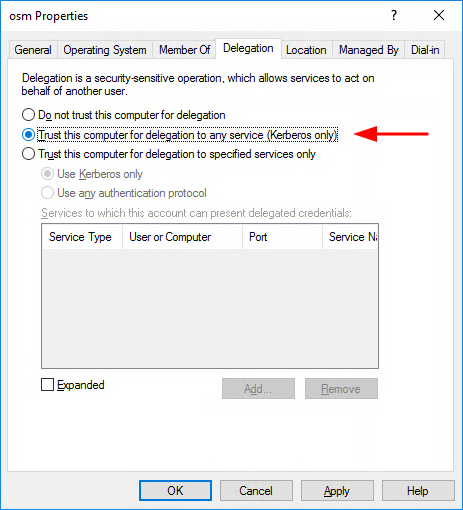
-
Click on Apply and OK.
The Session Manager is now configured in the Active Directory domain.
Create a Service Ticket
Up to this point, the system has been configured so that the Session Manager server is able to connect to the Active Directory domain. The next step is to get the Kerberos service keys in a keytab file so that the data can be used by the Apache web server on the Session Manager server. Samba is used to set the service principle(s) for Apache.
-
On the session manager server, login to a console as an administrator, in the example we are following this is
administrator@TEST.DEMO.After entering the command, you should see output similar to that shown below:
-
Now check that the
/etc/krb5.keytabfile contains theHTTP/osm.test.demoprincipal ticket by using thekutilcommand. -
Enter the path to the keytab file.
-
Type the command
listto show the contents.slot KVNO Principal ------------------------------------------------------------------------ 1 2 HTTP/osm.test.demo@TEST.DEMO 2 2 HTTP/osm.test.demo@TEST.DEMO 3 2 HTTP/osm.test.demo@TEST.DEMO 4 2 HTTP/osm.test.demo@TEST.DEMO 5 2 HTTP/osm.test.demo@TEST.DEMO 6 2 HTTP/osm@TEST.DEMO 7 2 HTTP/osm@TEST.DEMO 8 2 HTTP/osm@TEST.DEMO 9 2 HTTP/osm@TEST.DEMO 10 2 HTTP/osm@TEST.DEMO -
Exit the utility using the
exitcommand. -
Set access permissions for the
keytabfile. -
Set file group owner
-
For Ubuntu
-
For RHEL
-
Note
We want to set the default posix group used by the Apache process as the group owner of the keytab file. If for any reason your system overrides the default configuration value please refer to Apache Group.
Apache and Kerberos
Please follow the steps below:
-
Install the package first
-
For Ubuntu
-
For RHEL
-
-
Enable the Apache module. The Apache module should be loaded automatically after installing the package. If the module does not load, enter the command below:
-
Edit the configuration file:
-
For Ubuntu
-
For RHEL
-
-
and copy the following data into the file:
Alias "/test" "/var/www/test" <Directory "/var/www/test"> AllowOverride None DirectoryIndex index.php AuthType Kerberos AuthName "Kerberos Login" KrbServiceName HTTP/osm.test.demo KrbMethodNegotiate On KrbMethodK5Passwd On KrbAuthRealms TEST.DEMO Krb5KeyTab /etc/krb5.keytab require valid-user </Directory>- Replace
osm.test.demoby the FQDN of the Session Manager in your environment. - Replace
TEST.DEMOby your Active Direcory domain in upper case characters
- Replace
-
Create a folder
testin the web server root -
Create a
/var/www/test/index.phpfile and paste the following content in it: -
Restart the Apache service
-
For Ubuntu
-
For RHEL
-
Validate the Configuration
The example below must be completed on a Windows workstation running a domain user. Please install Firefox for testing purposes. In this example, we recommend to use Firefox because it is an easier browser with which to configure Kerberos.
First, configure Firefox to use Kerberos and then verify the configuration using HTTPS.
- Run Firefox
- In the URL field, enter the value
about:config. - In the search field, enter
network.nego. -
Change the two values to match the OSM FQDN e.g.
- network.negotiate-auth.delegation-uris: Right click and select
modify to enter the value
osm.test.demo -
network.negotiate-auth.trusted-uris: Right click and select modify to enter the value
osm.test.demo
- network.negotiate-auth.delegation-uris: Right click and select
modify to enter the value
-
Browse to the URL
http://osm.test.demo/test/. If SSO is working correctly, you will see information similar to the screenshot below: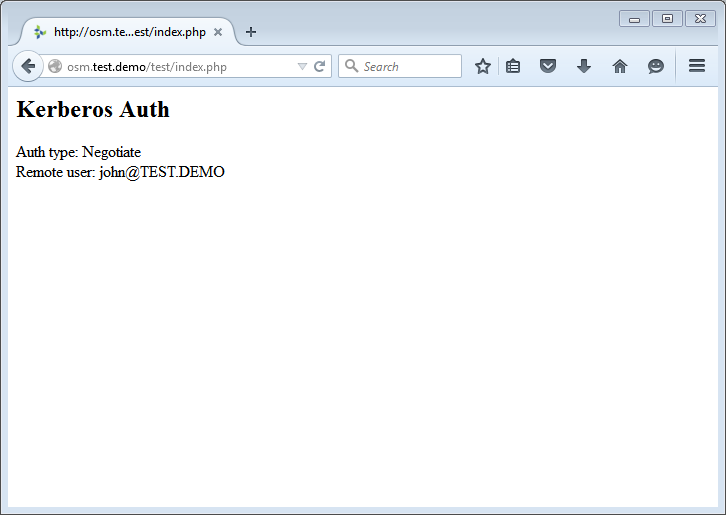
Kerberos and OVD
We have validated that Kerberos authentication over HTTP is working using a simple PHP example. The next step is to configure Kerberos authentication for the OVD Session Manager.
-
Duplicate the Apache SSL VirtualHost that already exists for the Session Manager:
-
For Ubuntu
-
navigate to directory
/etc/apache2/sites-enabled -
create a copy of the file
default-ssl.conf
-
-
For RHEL
-
navigate to directory
/etc/httpd/conf.d -
create a copy of the file
ssl.conf
-
-
-
Edit the
ovd-session-manager-kerb.conffile- Delete all the lines that appear before and after the VirtualHost section.
-
Change the
ServerNamesetting value to the OSM FQDN (osm.test.demoin this example)ServerName osm.test.demoNote
if no ServerName setting is defined yet, create a new one at the beginning of the VirtualHost definition.
-
Copy & paste the following block at the end of the VirtualHost definition
-
Replace
osm.test.demoby the FQDN of the Session Manager in your environment - Replace
TEST.DEMOby the Active Directory domain name in upper case characters
-
Edit the default SSL VirtualHost configuration file and change the
ServerNamesetting value to the IP address of the Session Manager.- For Ubuntu, the file
is
/etc/apache2/sites-enabled/default-ssl.conf -
For RHEL, the file is
/etc/httpd/conf.d/ssl.confNote
If no ServerName setting is defined, add the setting in the SSL Virtual Host configuration file.
- For Ubuntu, the file
is
-
Reload the Apache configuration
-
For Ubuntu
-
For RHEL
-
-
Go to the OVD Administration Console page: "Users / Authentication Settings"
-
Check the RemoteUser authentication checkbox
-
Set the Use Kerberos login method option to yes
-
Click on the Save button at the bottom of the page
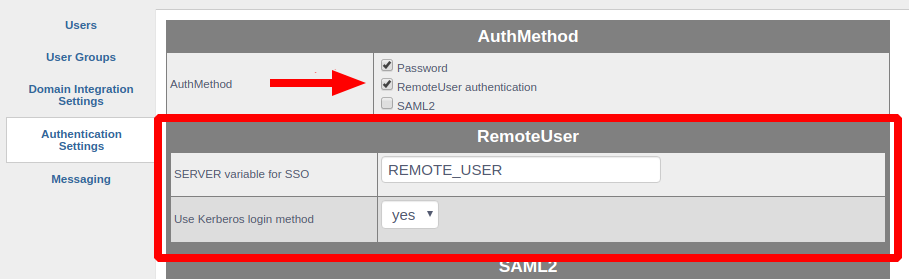
-
The SM is now configured to authenticate a user with Kerberos. The next step is to configure the OVD client to validate that the setup is working.
Note
This configuration for the Session Manager provides both regular and Kerberos authentication. If you want to disable regular authentication, the easiest way is to uncheck the Password checkbox in the OVD Administration Console.
OWA HTML5 Client
The Kerberos Authentication for the HTML5 client will only work if the OWA is installed on the same system as the OSM and it is accessed via HTTPS. The OWA must be configured to address the OSM using 127.0.0.1 or localhost. If it does not work, please review the steps mentioned in the Session Manager Configuration section from the beginning through to the Validate the Configuration section.
- Edit the OWA configuration file
/etc/ovd/web-access/config.inc.php- Uncomment the line
define('OPTION_FORCE_SSO', true); - The
SESSIONMANAGER_HOSTsetting must be set tolocalhostif it was defined with an IP or FQDN - Save and exit.
- Uncomment the line
-
Start Firefox and enter the URL
https://osm.test.demo/ovd/. You will see a screen similar to the one below if Kerberos is working properly.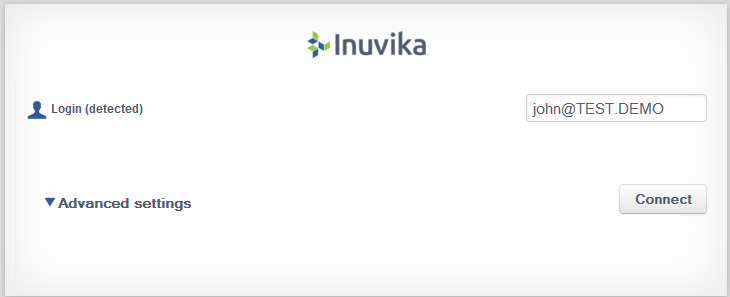
Note
Firefox must be configured to use Kerberos. To configure Firefox, follow the steps detailed in the Validate the Configuration section.
If the login panel does not show the user login name, check the firewall settings and re-check the steps again for Kerberos Authentication in section Session Manager Configuration.
Clicking on Connect will start the OVD session without the requirement to enter any further credentials.
Enterprise Desktop Client
This section applies to the Enterprise Desktop Client (EDC) running on a Windows workstation.
Workstation Configuration
The user workstation (Windows) must be configured to allow SSO authentication into OVD. For this, a local or domain admin access to the workstation is required. Please note that domain GPO (Group Policy) may be used to automate the changes below in an enterprise environment.
AllowTGTSessionKey
There is a key called AllowTgtSessionkey in the Windows registry that controls whether a client application is allowed to decrypt the session key of a Kerberos Ticket Granting Ticket (TGT). This capability must be enabled.
- Login as an admin user on the user workstation
- Run the registry editor:
regedit.exe - Create a registry entry as follows:
-
Create a DWORD entry with the name
AllowTgtSessionKeyand value1atHKEY_LOCAL_MACHINE\System\CurrentControlSet\Control\Lsa\Kerberos\Parameters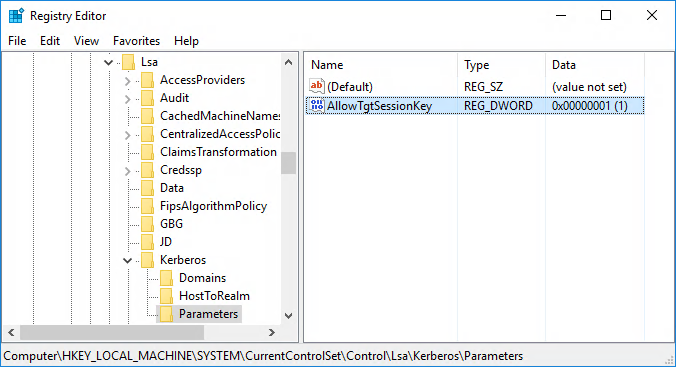
-
Enable DES
Depending on your version of Windows, further settings may need to be applied as described in the Microsoft information page at https://technet.microsoft.com/en-us/library/dd560670(v=ws.10).aspx
These settings apply to Windows 8 and newer.
- Open an admin session on the workstation
- Run
gpedit.mscfrom a command prompt -
Navigate
Computer Configuration → Windows Settings → Security Settings → Local Policies → Security Options -
Open the Network Security: Configure encryption types allowed for Kerberos setting and enable the following options:
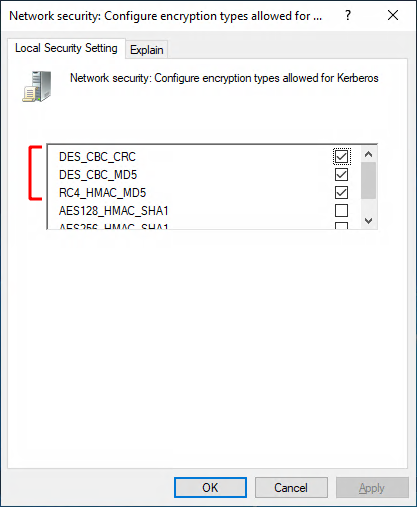
-
Reboot the workstation
EDC
Start the EDC and check Use Local credentials as shown in the figure below:
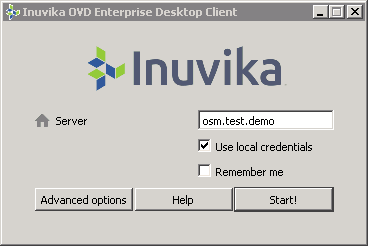
Note
Clicking on Start should start the session without the need to enter any further credentials.
Troubleshooting
Validate Test Case
If the test from section Validate the Configuration does not work, check the items below first:
- The server time on all servers is correctly synchronized and operational
- Browser is set-up correctly
- No firewall issues on the OSM node
- Check that the
auth_kerbmodule is enabled in Apache and ensure that the module is present and loaded.
If the test still does not work, the Apache Logs and web-browser developer tools console can provide further information. A tool such as wireshark can be used to monitor the HTTP data stream (HTTP instead of HTTPS +wireshark).
Enable the debug mode on the SM side by performing the following for the OVD session:
- Set-up the domain integration to Microsoft and internal session method
- Enable RemoteUser authentication as described in the Kerberos and OVD section.
- Enable debug mode the the OSM and Apache logs
- Enable the SSO option in the OWA by editing the OWA config file at
/etc/ovd/web_access/config.inc.php - Use HTTPS (it should not be HTTP)
DNS Issues
If the result from net ads join test failed as described in section Joining the Domain is as follows:
No DNS domain configured for osm. Unable to perform DNS Update.
DNS update failed!
Then the possible reasons are
- Invalid system hostname
- Invalid system network name in
/etc/hosts - Invalid system network name in the
smb.confconfiguration for thenetbios name
To resolve this issue, configure the system hostname and system network name for the Session Manager correctly and then remove the workstation from Active Directory and re-register it again.
Clock Skew
If there is an issue in authenticating OVD with Kerberos, turn on the
Apache error logs and check the reports for a Clock skew too great
error:
[error] [client 192.168.0.65] krb5_get_init_creds_password() failed: Clock skew too greatThis error indicates that the time on the Session Manager is not
synchronized with the time on the Active Directory Domain Controller.
Run the ntpdate command to fix the issue and check for the possible
reasons why the ntp service is not synchronizing it.
OWA HTML5
If the HTML5 client is not working, open the developer tools console in
Firefox and enter ovd.settings.http_provider and ensure it returns
direct. Otherwise the about:config settings were not saved.
Please refer to the screenshot below:

EDC
- Check your local credentials using the
klistcommand and ensure that there is anHTTP/osm.test.demoticket.
Static IP Address Configuration
Generally, the DNS information is stored in the /etc/resolv.conf
file. Sometimes, when you modify the file to have a specific DNS server
IP address, it may not be persistent because of the system configuration
and the modification may change when the system is rebooted or the
network service is restarted.
On Ubuntu and RHEL systems, the DNS configuration can also be
defined in the global network configuration. In turn, this will
overwrite the DNS modification made in /etc/resolv.conf. For these
reasons, it is recommended to modify the DNS information directly in the
global network configuration file.
-
For Ubuntu : Edit the
/etc/network/interfacesto add -
For RHEL : Edit the file
/etc/sysconfig/network-scripts/ifcfg-eth0to add
Apache Group
The system default group used by Apache is :
- For Ubuntu: www-data
- For RHEL: apache
If for some reason the system overrides the system default value or if you want to check it, the following command line will give you the group name used by apache on your system:
-
For Ubuntu
-
For group name starting with
Group: -
For group name associated with environmental variable
APACHE_RUN_GROUP
-
-
For RHEL