LDAP Integration Guide
Preface
This document describes how to configure OVD to integrate with an LDAP server. The guide does not cover the specifics of how to setup and configure an LDAP server.
Overview
Note
When multi-tenant mode has been activated, Users are tenant specific. A tenant must be selected before the Users tab can be added.
Inuvika OVD provides support to integrate with an LDAP server. As a minimum, integration with an LDAP server means that users are defined in the LDAP directory and OVD will delegate user authentication to the LDAP server. OVD will retrieve the list of users from the LDAP server but will not modify the user data. OVD is, by default, pre-configured to use the posixAccount object class to filter the LDAP directory to retrieve the set of users.
The system administrator can further choose whether to define user groups in the LDAP server or in OVD. When defining user groups in LDAP, OVD is pre-configured to use the posixGroup object class to filter the LDAP directory to retrieve the data for user groups.
When integrating with an LDAP server, the "Users" page in the OVD Administration Console (OAC) will always retrieve and display the set of users from the LDAP server independent of whether user groups are defined in LDAP or OVD. The user data cannot be modified within OVD, it must be modified directly in the LDAP server.
Before starting the integration with LDAP, ensure that the schema for filtering users, and user groups if applicable, is known and compatible with OVD. Object classes other than posixAccount and posixGroup may be used but please ensure that the schema chosen is compatible with the mapping configuration capabilities of OVD.
Each of the options is described in more detail below and can be configured in the OVD Administration Console (OAC) by selecting the "LDAP" option of the "Domain Integration Settings" on the "Users" tab.
LDAP Configuration
For the purposes of this document, we will use an LDAP server with the following configuration:
- LDAP server IP address: 10.254.0.161
- LDAP server distinguished name: dc=demo,dc=inuvika,dc=com
- read only user account: cn=ovd-ldap, ou=OVD OU, dc=demo,dc=inuvika,dc=com
There is no secondary server available in the example.
When anonymous bind is not allowed, an account with read access to the directory is required. In this example, the corresponding account is cn=ovd-ldap.
Firewall and Ports
OVD requires several ports to be open in order to interact with LDAP server. Although specific commands are provided in Firewall Configuration, IT Administrators should review and verify all necessary firewall rules in order to prevent possible service disruptions.
OVD Session Manager
-
Outgoing traffic
TCP 389(LDAP) orTCP 636(LDAPs) for communication with the LDAP server. Please refer to LDAP access for more information regarding which port to choose.
SELinux Configuration (RHEL only)
Important
This configuration only applies to SELinux enabled systems. For more information please refer to section in Installation and Configuration Guide: Security-Enhanced Linux
On OVD Session Maganager allow Apache to connect to LDAP server:
OVD configuration
This section describes how to configure OVD so that OVD can access data stored in the LDAP server.
Accessing the LDAP Server
The configuration parameters for the LDAP server are defined as follows:
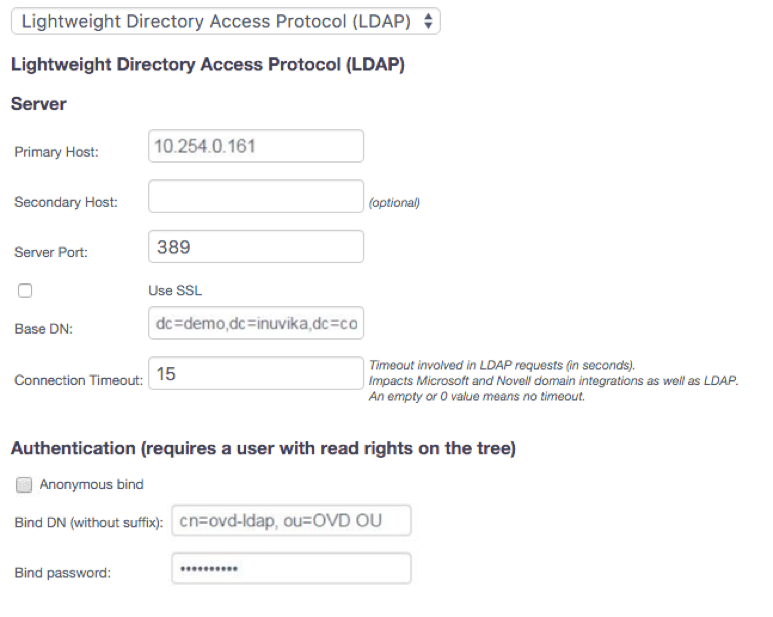
Primary Host: Enter the FQDN or IP address of the LDAP server. In our example this is 10.254.0.161.
Secondary Host: This parameter is optional and in the example we have there is no secondary LDAP server so this field is empty. If you have a secondary LDAP server, specify the FQDN or IP address here.
Server Port: The default ports are 389 for regular communication or 636
when using LDAP over SSL.
A different port may be used corresponding to the configuration of the LDAP
server.
Encryption: Define the encryption mechanism used to secure ldap connections. Possible values are:
-
None (default): LDAP connection is not encrypted.
-
StartTLS: LDAP connections use the default ldap port to open a secure session with the ldap server.
-
LDAP over SSL: LDAP connections use a port dedicated to a secure channel.
Additional requirement for encryption
Configuring transport encryption requires some extra configuration that is documented in the Configuring Transport Encryption with LDAP section.
Base DN: This field is mandatory and must contain the base distinguished name of the LDAP server, in our example dc=demo,dc=inuvika,dc=com. The base DN defines the root of the tree for the data that OVD will retrieve from the LDAP server.
Connection Timeout: This field specifies the timeout value in seconds to be used when connecting to the LDAP directory. This value also applies to Microsoft Active Directory integration. The default is 15 seconds.
Authentication
Access to the LDAP server can be authenticated either by using an anonymous bind or by defining a user account with read access rights on the LDAP directory tree.
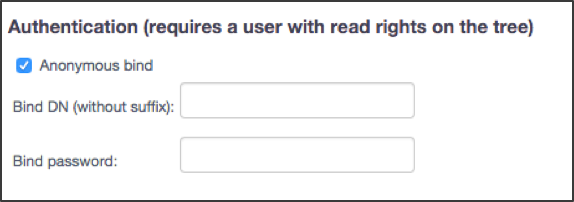

Anonymous bind: If using anonymous bind, select the check box. No further information is required so ensure that the BIND DN and Bind password fields are blank.
Test: At this point, the basic connection parameters can be tested by clicking the Test button at the bottom of the page. If everything is OK then the system will display information in the upper right corner of the screen in green. If there are any errors, then the error information will be displayed in red. To complete the configuration, refer to the Users and User Groups settings described in the next sections.
User Account Authentication
When using a specific user account to authenticate to the LDAP server, a user with read rights on the directory tree is required. In our example the common name of the user is ovd-ldap.
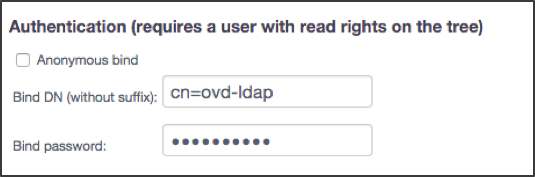
Anonymous bind : The checkbox must be unchecked when specifying a user.
Bind DN (without suffix): Enter only the DN without the suffix from the Base DN defined for the LDAP server.
Bind password: The password to be used for the user.
Test: At this point, the basic connection parameters can be tested by clicking the Test button at the bottom of the page. If everything is OK then the system will display information in the upper right corner of the screen in green. If there are any errors, then the error information will be displayed in red. To complete the configuration, refer to the Users and User Groups settings described in the next sections. Without further configuration, OVD will use Internal User groups as the default configuration.
Note
If the user account to be used for accessing the LDAP server is located in a group of users or Organization Unit (OU) such as in our example where we have the ovd-ldap user account located in the OU OVD OU (ou=OVD OU,dc=demo,dc=inuvika,dc=com) then there are two options that can be employed to filter users depending on the requirements:
- Changing the Bind DN; or
- Changing the Base DN
Change the Bind DN
In this case, the Bind DN is modified to pinpoint the user to be used for accessing the LDAP server. This method is recommended unless the root must be changed to a specific OU or user group to filter users and other objects.
In our example we have the following:
Base DN: dc=demo,dc=inuvika,dc=com
Bind DN (without suffix): cn=ovd-ldap, ou=OVD OU Which means, OVD will authenticate with LDAP using the following user: cn=ovd-ldap, ou=OVD OU,dc=demo,dc=inuvika,dc=com.
Change the Base DN
This option involves changing the Base DN to filter all the objects from
the LDAP directory. The new root will be ou=OVD
OU,dc=demo,dc=Inuvika,dc=com and OVD will only retrieve objects and
sub content (Users, User Groups and OUs) from within the OU OVD OU.
As a result the Bind DN does not require the OU parameter to be
specified.

In our example we have the following:
Base DN: ou=OVD OU,dc=demo,dc=inuvika,dc=com
Bind DN (without suffix): cn=ovd-ldap Which means, OVD will authenticate with LDAP using the following user: cn=ovd-ldap, ou=OVD OU,dc=demo,dc=inuvika,dc=com
Users Configuration
The Users section defines how user data is retrieved from the LDAP directory and mapped to user data in OVD. OVD is pre-configured to use the posixAccount object class for user data. The user login must be mapped and the user display name may be mapped if available. These fields are retrieved from the LDAP server and used within OVD for the administration console and user connection. Authentication is delegated to the LDAP server by OVD and so password data remains securely within the LDAP server.
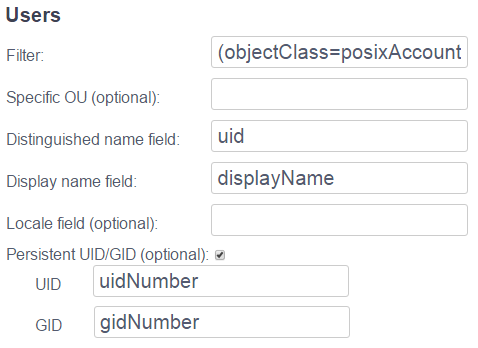
Filter: The name of an object class is required. Enter the name of the object class that is being used for user records in the LDAP server. By default, the posixAccount object class is used but other object classes may be used as long as they fit within the configuration possibilities provided.
Specific OU (optional): This field can be used to filter for users in a specific OU only.
Distinguished name field: This field defines the attribute in the
LDAP schema that identifies the distinguished name of the user record.
In the posixAccount object class, this is the uid attribute. The
data in the LDAP directory is mapped to the user login field in OVD.
Display name field (optional): This field defines the attribute in the LDAP schema that contains the user's display name. The data in the LDAP directory is mapped to the user's display name field in OVD. If not specified, the display name is defined as the value of the login.
Locale field (optional): This field defines the language setting for the OVD client being used to access the system. The format for the locale is the ISO-3166 country code. Normally, the language setting is configured within OVD so that the user can choose the language he wishes to use. If the Administrator wishes to force the language setting through LDAP, it can be done with this setting and also disabling the ability to select the language as a user via the Administration Console.
Email This field defines the attribute in the LDAP schema that identifies the user's email address. This field is optional but allows to preconfigure Two-Factor Authentication when using the email method. Please visit the Authentication Guide for more information.
Persistent UID/GID (optional): This option can be selected if you would like your users to be assigned a specific UID and GID that is defined in the LDAP schema. In this case, when a user connects to an Application Server, OVD will create a user on that server with the UID and GID values specified in the user record in the LDAP schema rather than using values assigned by OVD. Using persistent values for the UID/GID will allow you to manage access to resources based on the defined UIDs/GIDs that have been set in the LDAP directory.
UID: This field defines the attribute in the LDAP schema that
contains the user's UID. In the posixAccount object class, this is the
uidNumber attribute. This field is ignored unless the Persistent
UID/GID option is enabled.
GID: This field defines the attribute in the LDAP schema that
contains the user's GID. In the posixAccount object class, this is the
gidNumber attribute. This field is ignored unless the Persistent
UID/GID option is enabled.
The persistent UID/GID server setting is relevant when using an external data storage entry with an NFS server.
To add external data storage entries with NFS protocol see the Data Storage Guide.
User groups configuration
User groups can be defined using either user groups defined in the LDAP directory or defined internally in OVD by selecting the relevant option in the configuration page.
Internal User Groups
This is the default configuration when configuring LDAP integration. In this case, only User data is retrieved from the LDAP directory and User Groups are managed internally within OVD. No other fields need be defined in this section.
Use Internal User Groups: To manage User Groups within OVD rather than in LDAP, select this option.
Test: At this point, the complete configuration can be tested by clicking the Test button at the bottom of the page. If everything is OK then the system will display information in the upper right corner of the screen in green. If there are any errors, then the error information will be displayed in red.
Once the configuration has been defined and tested successfully, save the definitions using the Save button. Please refer to the Verification Testing section for information on checking that the LDAP system is correctly integrated with OVD.
LDAP User Groups
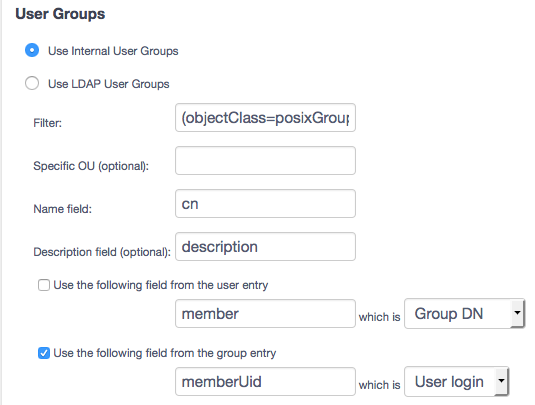
This configuration should be used when User Groups are defined and managed within the LDAP directory. In this case, User and User Group data are retrieved from the LDAP directory. By default, OVD is configured to use the posixGroup object class but other object classes may be used if they can be mapped using the interface in the Administration Console. The name of the user group as well as a mapping for how members of a user group can be determined must be defined. Optionally, a User Group description field can be defined. The members of a user group can be determined either by specifying how to retrieve the members of a user group or by specifying how to retrieve the user groups that a user belongs to.
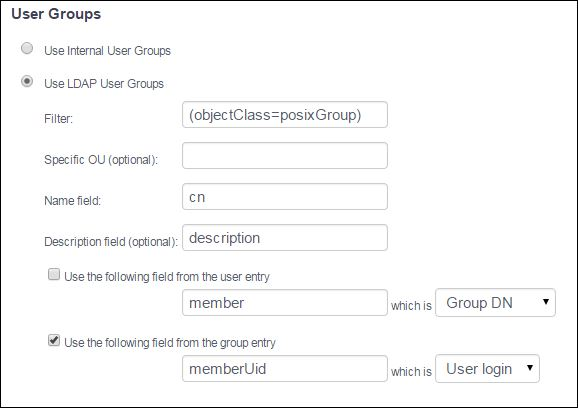
Use LDAP User Groups: To use the User Groups defined in the LDAP directory, select this option and complete the remaining configuration items. If the LDAP directory schema is based on the posixGroup object class, the settings should not need to be modified.
Filter: The name of an object class is required. Enter the name of the object class that is being used for the user group records in the LDAP server. By default, the posixGroup object class is used but other object classes may be used as long as they fit within the configuration possibilities provided.
Specific OU (optional): This field can be used to filter for User Group records within a specific OU.
Name field: This field defines the attribute in the schema that identifies the name of the User Group. For the posixGroup object class, this is the cn field. The data in the LDAP directory is mapped to the User Group name in OVD.
Description field (optional): This field defines the attribute, if
available, in the LDAP schema that identifies the User Group
description. For the posixGroup object class, this is the
description field. The data in the LDAP directory is mapped to the
User Group description in OVD.
Use the following field from the user entry: Select this mapping if
the membership of a user group is to be determined by retrieving the
user groups that a user belongs to. In addition, choose whether the user
groups will be determined by mapping a specific attribute in the user
record to the User Group name or by mapping the attribute to the User
Group DN. By default, the attribute to use is member and this value
may be overridden if not using the posixAccount object class. This field
is not enabled by default.
Use the following field from the group entry: Select this mapping if
the membership of a user group is to be determined by retrieving the
members of a user group. In addition, choose whether the members will be
determined by mapping a specific attribute in the user group record to
the User login name or by mapping the attribute to the User DN. By
default, the attribute to use is set to memberUID and this value may
be overridden if not using the posixGroup object class. This mapping is
enabled by default.
Note
Do not specify both Use the following field from the user entry and Use the following field from the group entry.
Once the configuration has been defined and tested successfully, save the definitions using the Save button. Please refer to the Verification Testing section for information on checking that the LDAP system is correctly integrated with OVD.
Verification Testing
Note
When multi-tenant mode has been activated, Users are tenant spacific. A tenant must be selected before the Users tab can be added.
To test whether the configuration is correct and OVD does retrieve the expected data, go to the "Users" tab in the OVD Administration Console to display the list of users. Verify that the list of users displayed matches the data in the LDAP directory. The number of records displayed can be modified temporarily by changing the Maximum items per page parameter in the "System Settings" page under the "System" tab.
Try adding a new user in the LDAP directory and verify that the user is listed in OVD.
If User Groups are being managed in the LDAP server, also verify that the list of User Groups is correct. Go to the "User Groups" page in the "Users" tab and verify the list displayed. Also, verify that the User Group contains the correct Users by spot checking a number of User Groups and Users.
Try adding a User to a User Group on the LDAP server and ensure that the data is reflected in OVD.
Correct any errors by modifying the configuration parameters accordingly. Once the data has been verified then OVD is correctly configured for use with an LDAP server.
Configuring Transport Encryption with LDAP
By default, LDAP communication between client and server applications is not encrypted.
Enabling a secure TLS/SSL communication channel requires extra configuration on the OVD Session Manager host and may require a change on your LDAP server if it is not already configured for TLS/SSL.
Issue and install a certificate on Active Directory
Detailing the process of issuing a certificate and configuring an LDAP server is beyond the scope of this documentation. Please refer to your LDAP server provider for documentation and instructions.
Your LDAP server may already be configured with encryption. In this case, proceed to the next section.
Please pay extra attention to the following point regarding a certificate's requirements:
-
The OSM will fail to establish a secure channel with the LDAP server if the Primary Host / Secondary Host field is not defined in the certificate as Common Name (CN) or Subject Alternative Name (SAN).
-
The Subject Alternative Name (SAN) extension can be used to define IP address access points as well as DNS entries.
Configure the Session Manager to trust the LDAP certificate
Once your LDAP server is configured with a certificate, you must update the OSM configuration to "trust" this certificate.
-
Import the CA certificate that signed your LDAP certificate into the OSM as
/etc/ssl/certs/ovd-ldap.pem-
When using self-signed certificates, the CA certificate is the LDAP certificate itself.
-
When using intermediary CA certificate(s), each intermediate certificate, plus the CA certificate, must be concatenated in a single PEM file in this exact order:
- Intermediary CA certificate Level n
- Intermediary CA certificate Level 2
- Intermediary CA certificate Level 1
- CA Certificate
-
-
Make sure the configuration file is accessible by OVD
-
Edit the LDAP configuration file
-
Ubuntu LTS:
/etc/ldap/ldap.conf -
RHEL:
/etc/openldap/ldap.conf
-
-
Add the following line
-
Restart Apache to apply the changes:
-
Ubuntu LTS:
-
RHEL:
-
Name resolution
When using names and not IP addresses to identify the LDAP server (related
to the certificate fields), it is required that the OVD Session Manager is
able to resolve the name.
This can be done by using a DNS server or by adding an entry in
/etc/hosts.
Multi-Tenant and multiple LDAP servers
When using OVD as a multi-tenant environment, you may have more than one LDAP / Active Directory to configure for encryption.
In this case, simply concatenate the CA certificate and Intermediate CA
certificates of each LDAP / Active Directory server into the
/etc/ssl/certs/ovd-ldap.pem file.
Apply the change in the OVD configuration
Back in the OVD Administration Console, configure LDAP access with encryption:
-
Primary Host: FQDN of the LDAP server that is defined in the certificate.
-
Enable the Encryption by selecting either the "StartTLS" or "LDAP over SSL" option
Note
When both encryption methods are available on your LDAP server, it is recommended to use StartTLS.
-
Use the Test button to perform a configuration check.
-
If, and only if, the check passes (no red annotations shown), click the Save button
All LDAP traffic between the OVD Session Manager and the LDAP server will now use a secure communication channel.
Firewall Configuration
For more detailed firewall configuration, please refer to the Firewall and Ports.
Follow the instructions below to configure default firewalls on the Session Manager.
-
If using UFW (default firewall for Ubuntu):
-
Open the LDAP port for outbound traffic:
Important
If you use a different port for communicating with your LDAP server, replace
389with the port you are using.For insance, when using the legacy LDAP over SSL encryption, the port to use is
636.Please refer to LDAP access for more information regarding which port to choose.
-
-
If using firewalld (default firewall for RHEL 7):
Warning
The following rules will open ports to communication in both directions. Administrators should review and verify all necessary firewall rules in case you need a more restrictive implementation.
-
Open the LDAP port:
Important
If you use a different port for communicating with your LDAP server, replace
389with the port you are using.For insance, when using the legacy LDAP over SSL encryption, the port to use is
636.Please refer to LDAP access for more information regarding which port to choose.
-
Activate updated firewall rules:
-
Troubleshooting
The following sub-sections provide different ways of troubleshooting communication issues with your LDAP server.
When using encryption, it is recommended to first validate communication without encryption.
Check the LDAP configuration using the command line
The ldapsearch utility is a very efficient way to troubleshoot
broken LDAP access and / or configuration issues.
ldapsearch is provided by the ldap-utils package on Ubuntu LTS and
openldap-clients on RHEL.
When detecting an LDAP communication problem, the Session Manager issues a
customized ldapsearch command line in the OSM logs. These command lines can be
copied from the logs and run verbatim to help the administrator identify the
issue.
Check connectivity with LDAP host
A common problem while configuring LDAP is TCP/IP connectivity issues.
This check should be run on the OSM node itself for best results.
-
When using a host name instead of an IP, ensure the name can be resolved using
getent hostsorping. -
Check the IP level connectivity with
ping. -
Check the TCP level connectivity with
telnet(port389or636). -
When using encryption, you can use the
opensslcommand to verify the configuration of your LDAP server:-
StartTLS
-
LDAP over SSL
-
Check LDAP open ports
On the LDAP server, you can manually check that the 636/tcp port is open
using iproute2's ss command: